Interior Basement Waterproofing: Best Methods Compared
You've already decided to waterproof from the inside. Now the real question: French drain, crack injection, wall coating, or vapor barrier? Each solves a completely different water problem — pick wrong and you'll pay twice. Here's the honest head-to-head.
Alex Rivers
Home Improvement Editor
Last Updated
October 17, 2026
In This Guide
If you've already read our breakdown of interior vs. exterior basement waterproofing and landed on "interior," congratulations — you just avoided a $20,000 excavation bill. But "interior waterproofing" isn't one thing. It's four genuinely different methods that solve four genuinely different water problems, and picking the wrong one is one of the most common — and most expensive — mistakes homeowners make. This guide compares them head-to-head so you spend money on the method that actually fixes what's wrong with your basement.
Our Picks at a Glance
The Short Answer
Superior Pump 1/3 HP Cast Iron Sump Pump (Top Pick: French Drain Method). The primary pump we'd install in any interior French drain system. Reliable, serviceable, and priced right — but pair it with a backup before you trust it with a flood.
- Top Pick: French Drain Method Superior Pump 1/3 HP Cast Iron Sump Pump — Sump Pump — French Drain System CoreCheck Price
- Top Pick: French Drain Method ADS 4-Inch Perforated Corrugated Drain Pipe (Sock-Wrapped) — French Drain ComponentCheck Price
- Top Pick: Crack Injection Method RadonSeal Polyurethane Crack Injection Kit — Interior Crack InjectionCheck Price
- Check Price
We may earn a commission when you buy through these links, at no extra cost to you. How we test
Top Pick: French Drain Method
Superior Pump 1/3 HP Cast Iron Sump Pump
1. The Four Interior Methods, Explained
Every serious approach to waterproofing inside a basement falls into one of four categories. They're not competitors ranked best to worst — they're tools built for different jobs, and the "best" one is whichever matches the water problem you actually have. Here's what each one does, in plain terms, before we get into cost and feasibility.
Method 1: Interior French Drain + Sump Pump
This is the heavyweight of interior waterproofing and the standard fix for a basement that actively floods. A channel is cut into the edge of the basement slab around the full perimeter (or the affected walls), a perforated pipe is bedded in gravel inside that channel, and it's pitched toward a sump pit where a pump ejects the collected water outside. Instead of trying to block water at the wall, this system intercepts it after it enters and gives it a controlled path out. It directly addresses hydrostatic pressure — the force of saturated soil pushing water up through the slab and in at the cove joint where the floor meets the wall — which is the single most common cause of a basement that actually floods.
Method 2: Interior Crack Injection
Crack injection is the most surgical method on this list, and it's built for one specific scenario: a single, identifiable crack in a poured-concrete wall that weeps or drips during heavy rain. A polyurethane (or sometimes epoxy) resin is injected under pressure through ports set along the crack, filling it front to back and curing into a flexible seal that bonds to the concrete and moves with the wall's natural seasonal expansion and contraction. It fixes exactly the crack it's applied to and nothing else — it does nothing for general wall dampness, a different crack six feet away, or a floor that's flooding from underneath.
Method 3: Interior Wall Coating / Sealant
A wall coating is a thick, waterproof paint-like product rolled or brushed onto bare masonry, where it bridges the microscopic pores that riddle concrete and concrete block. It stops dampness and seepage — moisture that migrates through the porous wall material itself, showing up as a damp feel, a musty smell, or white efflorescence deposits — but it is not designed for, and cannot stop, water that's actively pushing through under pressure. Apply it to the right symptom and it works exactly as advertised for a decade or more. Apply it to a basement that floods and it will blister and peel within a season or two as water forces its way around it.
Method 4: Interior Vapor Barrier / Dimpled Membrane
This method is different from the other three in that it's usually installed as part of finishing a basement rather than as a standalone waterproofing fix. A dimpled plastic membrane (or, more simply, a sheet of 6-mil poly) is attached to the foundation wall before the stud wall and drywall go up, creating an air gap and a moisture barrier between the concrete and the finished living space. Any residual dampness or minor seepage that gets past the wall is channeled down behind the membrane to the floor, often into the same French drain system, rather than soaking into insulation and framing where it would cause mold and rot. It's a protective layer for a finished space, not a fix for an active water source on its own.
The One-Sentence Version of Each
French Drain + Sump Pump
Catches water after it enters and pumps it out.
Crack Injection
Permanently plugs one specific leaking crack.
Wall Coating
Seals the wall's pores against dampness and vapor.
Vapor Barrier / Membrane
Protects a finished wall from residual moisture.
For a broader look at how these four interior methods stack up against digging up your yard entirely, see our interior vs. exterior comparison. And if you want every product option across every method — not just our top pick per category — our best basement waterproofing systems guide and basement waterproofing supplies roundup both go deeper on the exhaustive product lists.
2. Symptom → Method Decision Table
This is the table we'd want if we were standing in someone else's basement trying to figure out what's actually wrong. Match what you're seeing to the row that fits, and you'll know which of the four methods is the right one before you spend a dollar.
| What You're Seeing | Likely Cause | Interior Method |
|---|---|---|
| Water pools on the floor after heavy rain | Hydrostatic pressure under the slab | French drain + sump pump |
| Water rises at the cove joint (wall meets floor) | Hydrostatic pressure entering the joint | French drain + sump pump |
| One vertical crack weeps or drips during storms | Point-source crack in a poured wall | Crack injection |
| Damp, musty walls, no puddles, no active flow | Vapor migration through porous concrete | Wall coating / sealant |
| White chalky residue (efflorescence) on block walls | Mineral deposits from seeping moisture | Wall coating / sealant |
| Finishing the basement, want protection behind drywall | Preventing future condensation/seepage damage | Vapor barrier / dimpled membrane |
| Multiple cracks plus general dampness plus floor water | Combined problem — several water sources | Combine methods (see Section 6) |
| Bowing, leaning, or stair-step cracking walls | Structural / soil pressure issue | Structural engineer first — not waterproofing |
That last row is worth repeating on its own: if you see horizontal cracking, stair-step cracks through mortar joints, or any visible bowing or leaning in a foundation wall, stop and call a structural engineer before you call anyone about waterproofing. None of the four methods in this guide are designed to address — or safe to install around — a wall that's structurally failing.
| Method | Solves | Does NOT Solve | Typical Lifespan |
|---|---|---|---|
| French drain + sump | Active floor flooding, hydrostatic pressure | Wall dampness above the drain line | 20-30 years (pump: 7-10) |
| Crack injection | One specific poured-wall crack | Any other crack, general dampness | Permanent (that crack) |
| Wall coating | Dampness, vapor, light seepage | Active water, flooding, cracks | 10-15 years |
| Vapor barrier / membrane | Protects finished walls from residual moisture | The underlying water source itself | Life of the finished wall |
3. One Top Pick Per Method
We're not re-running a full product shootout here — our best basement waterproofing systems guide and basement waterproofing supplies roundup already cover the exhaustive lineups for every category. Instead, here's exactly one product per method — the one we'd actually buy if we needed that specific job done.

Superior Pump 1/3 HP Cast Iron Sump Pump
Sump Pump — French Drain System Core
If you're going the French drain route, the sump pump is the single component that determines whether the whole system works or fails at 2 a.m. during a storm. This cast-iron 1/3 HP unit is our pick for the core of that system because it strikes the right balance for a typical residential basin — enough throughput to keep up with a perimeter drain feeding it from all four walls, without the higher price and larger footprint of a 1/2 HP or 3/4 HP commercial-grade pump most houses don't need. Cast iron matters more than it sounds: the metal housing pulls heat away from the motor far more efficiently than the plastic housings on budget pumps, which is the difference between a pump that lasts 10 years and one that burns out in 3 after running hard through a wet spring. The float switch is a simple, low-tech vertical design that's less prone to the tangling and false-triggering that plagues some tethered switches in a tight sump basin. Installation is straightforward for anyone comfortable with basic plumbing — thread it onto a check valve and discharge pipe, drop it in the basin, and it's ready. Where people go wrong is treating this pump as a complete solution. It runs on household power, and the storms that push the most water into your sump pit are frequently the same storms that knock out the electricity in your neighborhood. This pump is excellent at the job it's built for; that job is only half of what a truly flood-proof system needs. Add a battery-backup or water-powered backup pump to the same basin, and you've closed the single biggest failure point in interior drainage. On its own merits as a primary pump, though, this is the one we'd put in our own basement.
Pros
- Cast iron housing dissipates heat better than plastic, extending motor life
- Automatic float switch activates reliably without manual priming
- 1/3 HP moves up to 3,000 gallons per hour — enough for most residential pits
- Compatible with any standard 1.5-inch discharge pipe and battery backup
- Sits low in the basin, pulling water down to under 2 inches remaining
Cons
- Primary pump only — needs a separate battery backup for storm power outages
- Float switch requires periodic cleaning to prevent sticking
The Bottom Line
The primary pump we'd install in any interior French drain system. Reliable, serviceable, and priced right — but pair it with a backup before you trust it with a flood.

ADS 4-Inch Perforated Corrugated Drain Pipe (Sock-Wrapped)
French Drain Component
Every interior French drain system, no matter which company's logo ends up on the paperwork, is built around a length of perforated pipe bedded in gravel around the basement perimeter, and this is the pipe we'd specify. The pre-wrapped filter sock is the detail that separates a system that works for 20 years from one that clogs with fine silt in five — the perforations let water in while the sock keeps the surrounding soil particles from washing in and packing the pipe's interior over time. The corrugated construction is what allows the pipe to flex around the corners of a basement foundation without a fitting at every turn, which matters because every fitting is a potential point where the sock can shift or tear during installation. Contractors install this in a channel cut along the base of the interior wall, bedded in clean, washed gravel that itself filters water before it ever reaches the pipe, then pitch it gently toward the sump basin so gravity does the work rather than relying on the pipe diameter alone. For homeowners who are DIY-capable and comfortable with a concrete saw and some genuinely hard labor, this component is buyable and installable without a contractor — but be honest with yourself about that project. Cutting a channel into a structural slab, maintaining consistent pitch over 100-plus linear feet, and properly bedding the gravel are exactly the kind of details that are easy to get wrong in ways you won't discover until the next heavy rain. We cover the full French drain buying list — this pipe plus gravel, basin, and fittings — in our complete guide to basement waterproofing systems, but this is the specific pipe we'd point you to if you're pricing out materials.
Pros
- Pre-wrapped filter sock keeps fine silt and soil out of the perforations
- Flexible corrugated design snakes around corners without rigid fittings
- Standard 4-inch diameter fits every common sump basin knockout
- Sold in long coils, minimizing joints and potential leak points
- Inexpensive enough that over-buying for a full perimeter isn't a real cost concern
Cons
- Corrugated ridges can trap sediment over time if the sock is damaged during install
- Flexible pipe needs consistent gravel bedding to maintain proper pitch
The Bottom Line
The actual pipe running under your slab in a professional French drain install. Not glamorous, but it's the component that determines whether water reaches the sump pit at all.
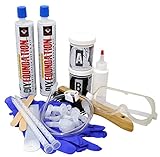
RadonSeal Polyurethane Crack Injection Kit
Interior Crack Injection
Crack injection is the most surgical of the four interior methods, and this kit is built around that precision. The process starts by grinding a shallow channel along the crack face and troweling on a fast-curing epoxy paste, into which plastic injection ports are seated every several inches down the crack's length. Once the epoxy sets — typically within a few hours — you connect a caulking gun to each port in sequence, starting at the bottom, and inject two-component polyurethane resin under pressure. The resin is thin enough to travel through the entire depth of the crack, including any hairline branches, and then expands and cures into a flexible, rubber-like seal that bonds to the concrete on both sides. That flexibility is the entire point: a rigid patch on top of the crack will simply re-crack the first time the foundation moves with the seasons, while the cured polyurethane flexes along with it and keeps sealing. This particular kit's biggest advantage for a nervous first-timer is that it includes everything in one box — you're not separately sourcing ports, paste, and resin from three different suppliers and hoping the epoxy formulations are compatible. The limitation to be clear-eyed about is scope: this is a fix for exactly the problem it's designed for, a single vertical crack in a poured-concrete foundation wall, and it does nothing for a wall that's damp across its whole surface, a basement floor that floods, or a block-foundation wall leaking through mortar joints rather than a crack. For that narrow but common problem, though, a $70–$100 kit does what a contractor charges $400–$800 to do, and if you're comfortable with a caulking gun and following instructions carefully, it's one of the most satisfying and cost-effective DIY repairs available. For a full walkthrough of the injection process step by step, see our basement crack repair guide.
Pros
- Complete kit includes epoxy paste, ports, and enough resin for a typical crack
- Polyurethane stays flexible after curing, moving with seasonal foundation shift
- Cures even inside a damp or actively weeping crack — no need to dry it first
- One kit costs roughly what a contractor charges just for the trip fee
- Detailed instructions make this genuinely approachable for a first-time DIYer
Cons
- Only works on poured-concrete walls — block, brick, and stone need a different fix
- One kit typically handles one crack up to about 8 feet; longer cracks need a second kit
The Bottom Line
If your only interior water problem is a single weeping crack in a poured wall, this kit fixes it permanently for a fraction of what any other method on this page costs.

DRYLOK Extreme Masonry Waterproofer
Interior Wall Coating
A masonry waterproofing coating occupies a specific, valuable niche among interior methods: it treats the wall itself rather than managing water at the floor. DRYLOK Extreme is a thick, cementitious latex coating that's rolled or brushed onto bare concrete or concrete block, where it physically bridges the microscopic pores that riddle any masonry surface. Water vapor and light seepage that would otherwise migrate through those pores — showing up as dampness, a musty smell, or the white crystalline residue called efflorescence — gets sealed out. In lab testing the manufacturer cites resistance up to 15 PSI of hydrostatic pressure, which sounds impressive and genuinely is more than enough for the porosity-driven dampness this product targets, but it's a figure worth understanding correctly: that rating describes water pressure trying to push through the concrete's pores, not water actively flowing through an open crack or the gap at the cove joint where wall meets floor. Two coats on properly prepared walls make a visible difference within the first dry day — walls that were chalky, damp to the touch, and faintly musty come out bright white (or tintable to another color) and dry. Surface prep is non-negotiable and is where most DIY coating jobs fail: the product bonds by soaking into open masonry pores, so it needs bare, wire-brushed, vacuumed concrete, and it will not adhere to old paint, sealer, or unaddressed efflorescence — skip that step and you'll be scraping peeling coating off the wall within a season. Used for what it's built for — dampness and seepage, not flooding — this is the best interior wall coating on the market and one of the few interior methods that's genuinely a weekend project for anyone who can operate a paint roller. For the full product lineup across brands and formulations, see our basement waterproofing supplies guide.
Pros
- Rated to resist up to 15 PSI of hydrostatic pressure on bare masonry
- Two coats reliably stop dampness, seepage, and efflorescence on porous walls
- Bright, paintable finish visibly transforms a dingy basement
- Roller-and-brush application — a true weekend DIY project, no contractor needed
- 10-year manufacturer warranty against waterproofing failure
Cons
- Does not stop active water — it's a surface seal, not a drainage system
- Requires bare, clean masonry; peels if applied over old paint or unaddressed efflorescence
The Bottom Line
The right interior coating for damp, musty walls with no standing water — and the wrong tool entirely for a basement that actually floods. Match it to the right symptom and it works exactly as promised.
4. DIY vs. Professional, Method by Method
"Interior waterproofing" gets lumped together as if it's a single skill level, and it isn't. Two of these four methods are genuinely approachable weekend projects. One is DIY-feasible for a homeowner comfortable with basic construction. One is a job we'd tell almost anyone to hire out. Here's the honest breakdown of each.
Wall Coating: Fully DIY
This is the most accessible method on the list, and it isn't close. Surface prep — wire-brushing loose material, vacuuming dust, degreasing any oil spots — is the labor-intensive part, but it requires no special tools beyond a wire brush and a shop vac. Application is a roller and a brush, the same skills required to paint a room. A weekend covers prep, two coats, and cure time for an average basement. The only way to fail at this project is skipping the prep step or applying it to the wrong problem (see Section 5).
Crack Injection: DIY-Feasible With Care
Crack injection kits are designed for homeowner use, and the instructions are detailed enough that a careful first-timer can succeed. The two places people mess up are rushing the epoxy port installation (the ports need a solid, air-tight seal to the wall or the injected resin will just leak out around them instead of filling the crack) and injecting too fast, which can push resin out the back of the wall into the soil instead of filling the crack itself. Go slowly, follow the sequence bottom-to-top, and this is a genuinely satisfying DIY win. If the crack is longer than about 8 feet, wider than a quarter-inch, or you're not confident distinguishing a shrinkage crack from a structural one, that's the point to call a professional instead.
Vapor Barrier / Membrane: DIY for the Handy
Installing a dimpled membrane or poly sheeting behind a stud wall is within reach for anyone comfortable with basic framing, a hammer drill, and construction adhesive or masonry fasteners. It's more physically demanding than the two methods above — you're working overhead and along entire wall runs — but it doesn't require specialized waterproofing expertise. The place this goes wrong for DIYers is failing to properly terminate the membrane at the top and bottom, or trying to install it as a fix for an active water problem rather than a protective layer over a problem that's already been solved. If you're framing a basement for the first time, budget extra time here and don't rush the seams.
French Drain + Sump Pump: Hire a Professional
This is the one method on this page we recommend against DIYing for most homeowners, and it's worth explaining why rather than just asserting it. Cutting a channel into a structural concrete slab requires a concrete saw and knowledge of where not to cut relative to the footing. The drain pipe has to maintain a consistent, gentle pitch toward the sump basin across the entire perimeter — even a few feet of reverse pitch creates a low spot where water sits and eventually backs up instead of draining. The sump pump has to be sized correctly for your soil's water volume, and the basin has to be set at the right depth to actually collect gravity-fed water rather than sitting above it. Get any of these wrong and the mistake is invisible until the next serious storm, at which point you're troubleshooting a system embedded under your slab rather than adjusting a product on the wall. Professional installers also carry the tools — concrete saws, laser levels for pitch, break-out equipment — that make this a one-to-two-day job instead of a multi-week ordeal for an unequipped DIYer. Expect to pay $4,000–$12,000 depending on perimeter length and whether a sump pit already exists, and treat that price as the cost of a system that has to work correctly on the first try.
The DIY Rule of Thumb
If the method involves a roller, a caulking gun, or a drill and fasteners, you can very likely DIY it. If it involves a concrete saw and pitch calculations under your slab, hire it out. The cost of a mistake scales with how permanently it's buried.
5. Common Mistakes When Choosing an Interior Method
Most of the expensive regret we hear about from readers doesn't come from a bad product — it comes from the right product applied to the wrong problem. These are the mistakes that show up over and over when homeowners are matching a method to their basement.
Coating a Wall That's Actually Flooding
This is the single most common and most expensive mistake on this list. A homeowner sees water and reaches for the most visible, most DIY-friendly fix — a wall coating — without checking whether the water is dampness (which a coating solves) or active flow at the floor or cove joint (which it doesn't). The coating may hold through a light rain, creating false confidence, and then blister and peel the first time a real storm sends water pushing through under pressure. The fix isn't a better coating — it's recognizing that a wet floor is a drainage problem, not a wall problem, and calling in a French drain and sump pump instead.
Injecting a Crack That's Actually Structural
Not every crack is a candidate for polyurethane injection. Vertical, hairline shrinkage cracks in a poured wall are the classic injectable case. Horizontal cracks, stair-step cracks through block mortar joints, or a crack accompanied by any visible bowing or displacement are signs of a structural or soil-pressure problem that injection does not address and that should be evaluated by a structural engineer before any waterproofing work begins. Injecting resin into a structurally compromised wall treats a symptom while leaving the actual danger unaddressed.
Skipping the Sump Battery Backup
Installing a French drain system and stopping there, without a battery or water-powered backup pump, leaves exactly one point of failure standing between a dry basement and a flooded one: household power. The storms that push the most water toward your sump pit are frequently the same storms that knock out electricity in the neighborhood, which means the single scenario a primary pump is least likely to survive is precisely the scenario it exists to handle. A backup pump costs a few hundred dollars added to a system that already costs thousands — skipping it to save that fraction is the definition of penny-wise and pound-foolish.
Installing a Vapor Barrier Before Solving the Water Source
A vapor barrier or dimpled membrane is a protective layer for a finished wall, not a fix for an unresolved water problem behind it. Framing and finishing a basement wall over an active leak or unaddressed dampness traps that moisture against organic materials — wood studs, drywall paper, insulation — creating ideal conditions for mold and rot that you won't discover until the finished wall is already failing. Solve the underlying water source with the appropriate method first — coating, injection, or drainage — and only then install the membrane and framing on top of it.
6. Combining Methods the Right Way
These four methods aren't mutually exclusive, and for a basement with more than one water problem, the right answer is often two or three of them working together rather than one system doing everything. A common, honest combination looks like this: inject any specific leaking cracks first, because leaving one unfilled undermines a coating applied over the top of it. Coat the remaining walls for the general dampness that's left. If the floor still takes on water after those two steps, that's the signal that hydrostatic pressure beneath the slab is the real remaining driver — not a sign the earlier work failed — and a French drain and sump pump is the appropriate next layer. If you're finishing the basement afterward, the vapor barrier goes on last, over a wall whose underlying water problem has already been resolved.
Where homeowners get into trouble is reversing that order — installing a French drain because it sounds like the most thorough option, while a specific crack keeps leaking above the drain line where the system can't reach it, or finishing a wall with a vapor barrier before dealing with the dampness that's already there. Diagnose first, apply the method that matches each specific symptom, and only escalate to the more expensive, more disruptive method — the French drain and sump pump — once you've confirmed the cheaper, more targeted methods aren't enough on their own. For more on how these interior methods stack up in cost and disruption against digging up your yard entirely, see our full interior vs. exterior comparison, and if your basement's symptoms don't cleanly match one category, our broader wet basement solutions guide walks through the complete escalation framework from free fixes through full excavation.
It's also worth being honest about when combining methods is overkill. A basement with one damp wall and no other symptoms doesn't need crack injection it doesn't have a crack for, or a French drain it doesn't need. Spend in proportion to the number of distinct problems you can actually identify, and resist the temptation — or a contractor's suggestion — to bundle in methods that don't correspond to a symptom you've actually observed. The goal is a dry basement at the lowest cost and disruption that actually gets you there, not maximum coverage for its own sake.
7. Frequently Asked Questions
What is the best method for interior basement waterproofing?
There isn't one best method — there's the method that matches your water problem. For a basement that actively floods on the floor after rain, an interior French drain routed to a sump pump is the standard, proven fix. For a single leaking crack in a poured wall, polyurethane crack injection is the targeted answer. For damp, musty walls with no standing water, a masonry wall coating solves it. For a basement you're finishing and want a moisture barrier behind the studs, a vapor barrier or dimpled membrane is the right layer. Match the method to the symptom rather than picking the most expensive option by default.
Can I waterproof basement walls from the inside without excavating outside?
Yes, in the large majority of cases. All four methods in this guide — French drain and sump pump, crack injection, wall coatings, and vapor barriers — are installed entirely from inside the basement, with no digging around the foundation. Interior methods resolve the most common causes of basement water, including hydrostatic pressure, point-source cracks, and porous-wall seepage, without touching your landscaping. Exterior excavation only becomes necessary for severe chronic flooding that interior systems can't keep up with, or when the foundation is already exposed for other work.
Which interior waterproofing method is actually DIY-friendly?
Crack injection and wall coatings are the two genuinely DIY-friendly interior methods — both are weekend projects using kits that cost well under $200 in materials. A vapor barrier behind a finished wall is DIY-feasible for someone comfortable with basic framing and fastening. A full interior French drain and sump pump system is the one method we recommend hiring a professional for: it involves cutting a channel into a structural concrete slab, maintaining precise pitch over the full perimeter, and correctly sizing the pump, and mistakes in any of those steps are expensive and disruptive to fix later.
How much does interior basement waterproofing cost?
Costs vary enormously by method. A DIY wall coating runs $50–$250 in materials for an average basement. A polyurethane crack injection kit is $70–$120 DIY or $400–$800 professionally installed per crack. A vapor barrier or dimpled membrane behind a finished wall runs $2–$5 per square foot in materials, or more installed. A professional interior French drain and sump pump system typically costs $4,000–$12,000 depending on perimeter length and whether a sump pit already exists.
Will a wall coating stop water from an actively flooding basement?
No. Wall coatings seal the microscopic pores in masonry, which stops dampness, vapor migration, and light seepage — but they cannot stop water that's actively pushing through a crack, a gap, or the cove joint under hydrostatic pressure. Applying a coating to a basement that floods on the floor is one of the most common wastes of money in interior waterproofing; the water simply finds its way around or through the coating, which then blisters and peels. If your floor gets wet after rain, you need a French drain and sump pump, not a coating.
How do I know which interior waterproofing method I need?
Match your symptom to the method. Damp, musty walls with white efflorescence but a dry floor means a wall coating. A single vertical crack in a poured wall that weeps during storms means crack injection. Water pooling on the floor, especially at the cove joint, after heavy rain means hydrostatic pressure and calls for a French drain and sump pump. Planning to finish the basement and want ongoing moisture protection behind the new wall means a vapor barrier or dimpled membrane, typically layered on top of whichever method addresses the underlying water source.
Related Basement Guides
Guide
Water Through the Basement Floor
Diagnosing where slab water comes from before choosing a system.
Comparison
Interior vs. Exterior Basement Waterproofing
Still deciding whether to go interior at all? Start here.
Buyer's Guide
Best Basement Waterproofing Systems
Every system — interior and exterior — ranked with the full product lineup.
Checklist
Best Basement Waterproofing Supplies
The exact coatings, kits, and pumps to buy for every method.
Myth-Busting Guide
Wet Basement Solutions
A cost-tiered guide from free fixes through full excavation.
How-To
Basement Crack Repair
The full step-by-step injection walkthrough.
How-To
How to Waterproof a Basement
The complete step-by-step DIY playbook.
The Bottom Line
There is no single best method for interior basement waterproofing — there's only the method that matches your actual symptom. A basement that floods on the floor needs a French drain and sump pump, full stop; nothing else on this list will keep up with that volume of water. A single weeping crack needs injection, not a whole-perimeter drain system. Damp, musty walls need a coating, not excavation of any kind. And a finished basement wall needs a vapor barrier as a protective layer once — and only once — the underlying water problem has already been solved.
Diagnose your specific symptom honestly, match it to the method built for that exact job, and you'll spend money once instead of working your way through every option the expensive way. That's the entire difference between interior waterproofing done right and interior waterproofing that keeps you googling the same problem again next spring.
More in Basement Waterproofing
Guides in this category that pair with what you just read.
About the Author
Alex Rivers, Home Improvement Editor
Alex has spent over a decade working on residential and light commercial property maintenance, and now tests every tool, coating and machine that appears in these guides personally.