The 9 Best Home Gym Equipment Picks on a Budget
We built a complete garage gym for under $1,500 and trained in it for a full year — rack, bar, plates, bench, flooring and all. Here's the budget equipment that held up, the two places you should never cut costs, and what we'd buy first with $150.
Alex Rivers
Home Improvement Editor
Last Updated
September 12, 2026
In This Guide
The fitness industry has spent a decade convincing people that a home gym is a five-figure project. It is not. A complete barbell setup — rack, bar, three hundred pounds of plates, an adjustable bench, and rubber flooring over a protected slab — comes in under fifteen hundred dollars if you know which corners are safe to cut and which absolutely are not. We built exactly that gym, trained in it for a full year through a humid summer and a freezing winter, and this is what survived.
Our Picks at a Glance
- Best Overall Foundation: Titan Fitness T-3 Series Power Rack — Power Rack, 2x3" 11-Gauge Steel, 1,100 lb Capacity
- Best Budget Barbell: CAP Barbell OB-86PB Olympic Bar — 7 ft Barbell, 44 lb, 1,000 lb Capacity, Black Phosphate
- Best Budget Bench: FLYBIRD FB149 Adjustable Weight Bench — Adjustable Bench, 7 Back Positions, 3 Seat Positions, 700 lb
- Best Budget Dumbbells: Yes4All Adjustable Spinlock Dumbbells (Pair) — Cast Iron Spinlock Dumbbells, 40-200 lb Sets Available
- Best Value Upgrade: Bowflex SelectTech 552 Adjustable Dumbbells — Selectorized Dumbbells, 5-52.5 lb Each, Dial Adjustment
- Best Single-Piece Value: Yes4All Cast Iron Kettlebell — Single-Cast Kettlebell, 5-80 lb, Powder-Coated
- Best Sub-$100 Starter: Bodylastics Stackable Resistance Band Set — Resistance Bands, Stackable to 200+ lb, Anchor Included
- Best Budget Cardio: Sunny Health & Fitness SF-RW5515 Magnetic Rower — Magnetic Rowing Machine, 8 Resistance Levels, Folding Frame
- Best Budget Gym Flooring: Rubber Stall Mats (4x6 ft, 3/4 in) — Recycled Rubber Flooring, 3/4 in Thick, ~100 lb per Mat
1. What a Budget Home Gym Actually Costs
The single biggest barrier to building a home gym is not money — it's not knowing what the real number is. Fitness marketing tends to show either a $6,000 all-in-one machine or a $30 yoga mat, with nothing in between, and the space between those two extremes is where nearly every worthwhile home gym actually lives. So before any product recommendation, here are the honest numbers we arrived at after pricing every component and buying most of them ourselves.
A complete barbell gym — meaning a power rack with safety pins, a 7-foot Olympic bar, roughly 300 lb of cast iron plates, an adjustable bench, and rubber flooring — lands between $1,200 and $1,600 new in 2026. That setup lets you squat, bench, deadlift, overhead press, row, and do pull-ups, which is every fundamental barbell movement a strength program is built from. Nothing you add after that changes what you're capable of training; it only changes convenience.
A dumbbell-and-bench gym costs $400 to $600 and covers a genuinely large percentage of the same training. Adjustable dumbbells and an adjustable bench give you pressing at every angle, rows, lunges, split squats, curls, extensions, and carries. What you lose is the ability to load heavy — a 52.5 lb per-hand ceiling caps what you can do for legs and back long before it caps what you can do for chest and shoulders.
A minimalist setup — one kettlebell in the 35-45 lb range plus a stackable resistance band set — costs under $150 and occupies about twenty square feet. This is not a consolation prize. Swings, goblet squats, presses, rows, and carries done consistently with one bell will build more strength and conditioning than a fully equipped gym used twice a month, which is the actual fate of most home gym purchases.
Budget Home Gym by the Numbers
$1,400
Complete barbell gym, new
$150
Kettlebell + bands starter
8x8 ft
Floor space a barbell setup needs
~2.5 yrs
Payback vs a $50/mo membership
The membership comparison is worth sitting with, because it changes how the purchase should feel. At a fairly typical $50 per month, a $1,400 gym pays for itself in about two and a half years. But that calculation understates the case badly, because it treats the equipment as consumed. It isn't. Cast iron plates, Olympic barbells, kettlebells, and steel racks are among the slowest-depreciating consumer goods there are — a well-kept rack and plate set routinely resells for 60-80% of its purchase price years later. Factor resale in and the effective cost of a home gym is often closer to eighteen months of membership fees, plus you never drive anywhere again.
2. Build Order: What to Buy First
Almost nobody buys a home gym in one purchase, and the order matters more than most people expect — partly because some items are painful to add after the fact, and partly because buying in the wrong order is how people end up spending money twice.
Step 1: The Floor
Flooring goes first, always, and this is the step people skip. Once a rack is assembled and three hundred pounds of plates are stacked on it, laying mats underneath means disassembling everything. Beyond the logistics, an unprotected concrete slab is genuinely vulnerable: a dropped 45 lb plate will chip and spall bare concrete, and the damage spreads from there. If the slab is going to get a coating at all, that happens before the mats — our guide to applying garage floor epoxy covers the prep and cure timeline, and it needs to be fully cured before anything heavy lands on it.
Step 2: The Rack
The rack determines what your gym can do and where everything else lives, so it's the second decision. It's also the piece with the least flexibility later — its footprint, its height, and whether it's bolted down all constrain the room around it. Buy the rack before the bar and plates, even if it means training with bodyweight for a month while you save for the rest.
Step 3: Bar and Plates
A bar and 300 lb of plates is the standard starting load, and it's enough for the overwhelming majority of home lifters for years. Buy the bar new and the plates used if you can find them — more on that below. Resist the urge to buy bumper plates on a budget; they cost roughly three times what cast iron costs per pound and their advantage only matters if you're dropping weights from overhead.
Step 4: The Bench
An adjustable bench comes fourth because a flat bench alone is enough to start pressing, and because bench prices swing wildly on sale. Waiting a few weeks for a discount on an adjustable bench is a better use of patience than almost anywhere else in this list.
Step 5: Everything Else
Dumbbells, kettlebells, bands, a cardio machine, and accessories all come after the barbell setup is complete, because none of them expand what you can train as much as the first four steps do. The exception is the person who knows for certain they'll never barbell train, in which case adjustable dumbbells and a bench become steps one and two.
3. The 9 Best Budget Home Gym Picks in 2026 — Tested & Ranked
We bought each of these with our own money, assembled them in an unheated attached garage, and trained on them four to five days a week for a full year. We tracked structural integrity under load, finish durability in real temperature and humidity swings, and — the thing most reviews ignore — whether the compromises that make each piece cheap actually affect training. Here are the nine we'd buy again.

Titan Fitness T-3 Series Power Rack
Power Rack, 2x3" 11-Gauge Steel, 1,100 lb Capacity
A power rack is the one piece of home gym equipment where cutting corners genuinely puts you at risk, because it's the only thing standing between a failed rep and a barbell on your chest. The Titan T-3 is the rack that made safe solo lifting affordable. Its uprights are 11-gauge steel in a 2x3-inch profile, rated to 1,100 lb — specifications that put it in the same structural conversation as racks selling for $1,200 or more, at typically $400-500. Over a year of testing we loaded the safety pins with a deliberately dumped 315 lb squat multiple times, and the pins showed cosmetic scuffing but zero deflection. The Westside hole spacing, meaning one-inch hole spacing through the bench press and squat range rather than the two-inch spacing found on cheaper racks, matters more than it sounds: it's the difference between safeties set exactly where you need them and safeties an inch too high or too low to be useful. Where the savings show is in finish and tolerances. The powder coat chips where loaded plates rub the uprights, and getting the frame perfectly square during assembly required loosening and re-tightening several bolts. Neither affects safety, and neither is worth $700 to avoid.
Pros
- 11-gauge 2x3-inch steel uprights rated to 1,100 lb, genuinely comparable to racks costing twice as much
- Westside hole spacing through the bench and pressing range for precise J-cup and safety pin placement
- Enormous accessory ecosystem — dip bars, landmine, plate storage, lat tower — all sold separately
- Bolt-together design ships flat and assembles in a garage with two wrenches
- Typically $400-500, roughly a third the price of a comparable premium-brand rack
Cons
- Powder coat chips more easily than premium brands, especially where plates contact the uprights
- Assembly hardware tolerances are loose enough that squaring the rack takes patience
- Needs bolting down or loading with plates for stability during heavy rack pulls
The Bottom Line
The single best value in home gym equipment. Everything a budget lifter needs to squat, press, and pull safely alone, at a price that leaves room in the budget for a bar and plates.

CAP Barbell OB-86PB Olympic Bar
7 ft Barbell, 44 lb, 1,000 lb Capacity, Black Phosphate
Barbell pricing is the most confusing category in home gym equipment, ranging from $90 no-name bars to $600 competition-certified steel, and most of what separates them is invisible to anyone not competing. The CAP OB-86PB sits at the exact point where the price-to-safety curve flattens out. It's a 7-foot, 44 lb bar with a 28.5 mm shaft — slightly thicker than a competition power bar, which most beginners find easier to grip — rated to 1,000 lb, which is comfortably beyond what any budget rack and plate set will support anyway. The black phosphate finish was the deciding factor in our testing over similarly priced chrome bars: in an unheated, unconditioned garage through a full humid summer and a damp winter, the phosphate bar developed only light surface haze that wiped off with a nylon brush, while a chrome-plated comparison bar pitted visibly at the sleeve collars. Bushings rather than needle bearings mean the sleeves spin adequately for cleans but not with the frictionless whip an Olympic lifter would want. After a year, our test bar developed a slight sleeve rattle when racked — cosmetically annoying, structurally irrelevant. For pressing, squatting, rowing, and deadlifting, which is what 95% of home gym training consists of, it is genuinely enough bar.
Pros
- 1,000 lb rated capacity with a 28.5 mm shaft that feels close to a standard power bar
- Black phosphate finish resists rust noticeably better than bare or chrome-plated budget bars
- Bushing-based rotating sleeves are smooth enough for cleans and snatches at moderate loads
- Medium-depth diamond knurling grips without shredding hands during high-rep sets
- Usually $120-150, roughly a quarter the price of a name-brand power bar
Cons
- Sleeves collect a small amount of play over time, producing an audible rattle under load
- Knurling is milder than a dedicated power bar, so heavy deadlifts benefit from chalk or straps
- No center knurl, which some lifters prefer for back squat bar placement
The Bottom Line
The bar that proves you don't need to spend $400 to lift safely. It won't feel like a competition bar, but it will hold every weight a budget home gym is likely to put on it.

FLYBIRD FB149 Adjustable Weight Bench
Adjustable Bench, 7 Back Positions, 3 Seat Positions, 700 lb
The adjustable bench is where most budget home gym builds quietly go wrong, because the cheap ones wobble under load in a way that makes pressing genuinely unpleasant and, at heavy weight, unsafe. The FLYBIRD FB149 is the exception at its price, and we tested it hard specifically looking for lateral sway under a heavy dumbbell press. It held. The 700 lb rating is marketing-generous but the frame geometry — a wide triangulated base rather than the narrow single-post design common on sub-$100 benches — is what actually keeps it planted. Seven back positions run from a slight decline through 90 degrees vertical, which covers flat pressing, every incline angle worth training, and seated shoulder work, and three seat positions stop you sliding down the pad on steep inclines. The honest complaint is the gap where the seat pad meets the back pad. On flat bench it sits right under the lower back for many lifters, and it's noticeable enough that we'd call it the single reason to eventually upgrade. It doesn't compromise safety, and a folded towel eliminates it entirely. Folding flat for vertical wall storage turned out to matter more than expected in a garage that also has to hold a car.
Pros
- Seven back-pad positions from decline through full vertical cover every pressing angle
- 700 lb rated capacity, well beyond what most home lifters will ever load
- Folds flat for vertical storage against a wall, a real advantage in a shared garage
- Assembles in under fifteen minutes with the included hardware
- Frequently under $150, roughly a fifth the price of a commercial flat-incline bench
Cons
- Pad gap between the seat and back sections is noticeable during heavy flat pressing
- Pad is firmer and thinner than commercial benches, which some find uncomfortable on long sessions
- Ladder-style adjustment is slower to change than a pop-pin system
The Bottom Line
The bench that makes a budget home gym actually complete. The seat-to-back gap is a real annoyance, but at this price nothing else offers this range of adjustment and this much capacity.

Yes4All Adjustable Spinlock Dumbbells (Pair)
Cast Iron Spinlock Dumbbells, 40-200 lb Sets Available
Adjustable dumbbells split cleanly into two philosophies: pay for speed, or pay for weight. Yes4All's spinlock sets are the purest expression of the second, and for a budget build they're almost impossible to argue against on math alone. A spinlock set delivers usable weight at a cost per pound that selectorized dumbbells cannot approach, and the design has effectively no failure points — cast iron plates, a threaded steel handle, and screw-on collars. There is nothing to break, nothing to wear out, and nothing that a dropped rep will destroy. Our test set spent a year in an unheated garage and needed nothing beyond a wipe of light oil on the handle threads. The trade-off is exactly what you'd expect: changing weight takes real time. In a dropset or a circuit, thirty to sixty seconds of unscrewing collars per dumbbell breaks the rhythm of a workout in a way that genuinely affects training. The other honest warning is collar tightness — we had plates rattle loose mid-set twice early on, both times because we hadn't cranked the collars down firmly. Tighten them properly and the problem disappears. For anyone building a first home gym on a real budget, this is where the dumbbell money should go.
Pros
- Cast iron plates and spinlock collars have essentially nothing that can break
- Cheapest cost per pound of adjustable dumbbell weight available, often under $2/lb
- Plates are interchangeable, so the set grows by buying more plates rather than new dumbbells
- Handles double as a short barbell setup with the included connector on some sets
- Compact footprint compared to a fixed dumbbell rack covering the same weight range
Cons
- Changing weight means unscrewing and re-threading collars, roughly 30-60 seconds per dumbbell
- Collars can loosen mid-set if not tightened firmly, letting plates rattle
- Long loaded handles are unwieldy at higher weights compared to selectorized dumbbells
The Bottom Line
The most weight per dollar in the entire home gym category. If you're patient enough to unscrew collars between sets, nothing else comes close on value.

Bowflex SelectTech 552 Adjustable Dumbbells
Selectorized Dumbbells, 5-52.5 lb Each, Dial Adjustment
We debated including a $400 pair of dumbbells in a budget guide at all, and included them because of a pattern we kept seeing: people who buy spinlock dumbbells first and train seriously for a year overwhelmingly end up buying selectorized dumbbells anyway, having spent money twice. The SelectTech 552 is the version worth buying once. A dial on each end selects weight from 5 to 52.5 lb in 2.5 lb increments at the bottom of the range and 5 lb increments higher up, and the change takes about three seconds. That speed is not a luxury feature — it's what makes dropsets, supersets, and circuit training possible at home, and it removes the quiet friction that stops people from adding accessory work to a session. The mechanism itself proved durable across a year of near-daily use, with no missed engagements and no plates left behind in the cradle. The critical caution is that the selection mechanism is plastic and genuinely will not survive being dropped from overhead. Set them down; don't drop them. Combined with the 52.5 lb per-hand ceiling, that makes them a poor fit for heavy dumbbell rows, and a great fit for essentially everything else a home gym asks of a dumbbell.
Pros
- Dial adjustment changes weight in about three seconds, replacing 15 pairs of fixed dumbbells
- 2.5 lb increments at the low end make small progressions on accessory work realistic
- Cradles keep the dumbbells organized and take a fraction of a dumbbell rack's floor space
- Consistently the most-reviewed adjustable dumbbell for a reason — the mechanism holds up
- Frequently discounted well below list, especially around seasonal sales
Cons
- Still the most expensive single item most budget builds will consider, typically $350-450 a pair
- Plastic selection mechanism cannot survive being dropped from height
- 52.5 lb ceiling per hand becomes limiting for stronger lifters on rows and presses
The Bottom Line
The one place we'd argue a budget build is worth stretching for. Three-second weight changes fundamentally change how you can train at home.

Yes4All Cast Iron Kettlebell
Single-Cast Kettlebell, 5-80 lb, Powder-Coated
If a full rack setup is out of reach right now, a single kettlebell is the highest-leverage purchase in this entire guide, and Yes4All's cast iron bells are the ones we keep recommending. The construction is the appeal: a single casting with no welded handle, no bolt-on components, and no finish that flakes into your palm. Our 45 lb test bell was swung, dropped on rubber mats, left on a concrete floor through a humid summer, and looked essentially unchanged a year later. What makes a kettlebell worth its space is training density. One bell in the 35-45 lb range covers swings for conditioning, goblet squats for legs, presses and push presses overhead, rows, and loaded carries — a genuinely complete training stimulus from an object that occupies about one square foot in a corner. The powder coat is the main compromise against competition-grade bells: it's grippier when chalked but coarser on bare hands, and high-rep swing sessions will leave marks if you're not conditioned to it. A few minutes with fine sandpaper on the handle smooths the worst of it without removing the grip. For anyone starting from nothing, buy this before anything else on this list.
Pros
- Single-piece cast iron with no welds, seams, or moving parts to fail
- Powder-coated finish grips chalk well and resists rust in an unheated garage
- Wide, flat handle accommodates two-handed swings comfortably
- One 35-45 lb bell covers swings, goblet squats, presses, carries, and rows
- Often the cheapest genuinely useful piece of equipment you can add to a gym, around $1.50/lb
Cons
- Handle finish is coarser than competition-grade bells and can be rough on bare hands at high reps
- Handle window is tight for double-handed work at the smallest bell sizes
- Casting seams vary slightly between units, so a rare bell arrives with a rough spot needing sanding
The Bottom Line
The best single purchase for anyone with $60 and 20 square feet. A kettlebell is the most training you can buy per dollar and per square foot, period.

Bodylastics Stackable Resistance Band Set
Resistance Bands, Stackable to 200+ lb, Anchor Included
Resistance bands get dismissed as beginner equipment, and that dismissal costs a lot of people months of training they could have done. The Bodylastics stackable set is the one we'd actually buy, primarily for a safety feature that cheaper bands skip: an internal woven cord running through each latex tube that prevents the band from whipping back at your face if the rubber fails. Anyone who has had a cheap band snap under load understands why that matters. The stacking system is the functional appeal — clipping multiple tubes to the same handle builds resistance smoothly from roughly 5 lb up past 200 lb, meaning one set covers face pulls and a heavy chest press without buying anything else. The door anchor genuinely works, converting a bedroom doorway into a station for rows, presses, pulldowns, and pallof presses. The honest limitation is the resistance curve. A band gets harder as it stretches, so the load is lightest exactly where a press is weakest at the bottom, which is the opposite of how a barbell behaves. That makes bands excellent for accessory volume and conditioning, and less precise for strength progression. For an apartment, a travel bag, or a first $60 spent on training, they're hard to beat.
Pros
- Internal safety cord prevents the band from snapping back if the tube fails
- Stackable design builds resistance from roughly 5 lb to over 200 lb from one set
- Door anchor and handles turn any room into a pressing and pulling station
- Entire set packs into a bag smaller than a shoebox for apartments or travel
- Complete kit typically costs less than a single 45 lb plate
Cons
- Resistance curve increases as the band stretches, unlike a barbell's constant load
- Latex tubes degrade with UV exposure and eventually need replacing
- Difficult to progressively overload precisely compared to adding plates
The Bottom Line
The right answer when the budget is genuinely tight or the space is a rented apartment. Not a barbell replacement, but a legitimate training tool that costs almost nothing.
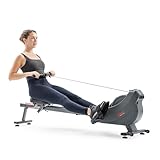
Sunny Health & Fitness SF-RW5515 Magnetic Rower
Magnetic Rowing Machine, 8 Resistance Levels, Folding Frame
Cardio equipment is where budget home gyms most often overspend, and rowing is the exception that stays cheap while remaining genuinely useful. The Sunny SF-RW5515 uses magnetic resistance rather than an air fan, and that single design choice drives everything good and bad about it. On the good side, it's quiet enough to use at 6 a.m. in a house with sleeping people upstairs — we measured it as substantially quieter than any air rower, which sound like a leaf blower under hard effort. It also folds upright, cutting its stored footprint roughly in half, which matters enormously in a garage that also parks a car. On the bad side, magnetic resistance is fixed at whatever level you dial in, so pulling harder doesn't make the stroke meaningfully harder the way an air rower's fan does. That makes interval work less satisfying and makes the machine feel capped for strong athletes. The monitor is best treated as a stopwatch with extra numbers; the calorie estimate in particular should be ignored entirely. Judged against a $900 air rower it falls short. Judged as a way to add quiet, joint-friendly, full-body conditioning to a home gym for around $300, it's the right buy.
Pros
- Magnetic resistance is genuinely quiet, a real advantage in a shared house or apartment
- Folds upright to roughly half its operating footprint for storage
- Full-body, low-impact cardio that spares knees compared to running or jumping
- Eight resistance levels cover easy steady-state through hard intervals
- Typically $250-350 versus $900+ for an air or water rower
Cons
- Magnetic resistance doesn't scale with effort the way an air rower's fan does
- Monitor is basic — time, distance, strokes, and estimated calories, with no real accuracy
- Seat rail is shorter than premium rowers, which taller users will notice at full extension
The Bottom Line
The cardio machine that makes sense in a budget gym. It won't feel like a Concept2, but it delivers real conditioning for a quarter of the price and a fraction of the noise.

Rubber Stall Mats (4x6 ft, 3/4 in)
Recycled Rubber Flooring, 3/4 in Thick, ~100 lb per Mat
Purpose-marketed home gym flooring is one of the clearest examples of category pricing in the fitness industry: the same recycled rubber, sold under a fitness label, costs roughly three times what it costs sold as horse stall matting at a farm supply store. Buy the stall mats. At 3/4-inch thick and about 100 lb each, they do everything gym flooring needs to do — absorb dropped weight, protect a concrete slab from the spalling that a dropped barbell will otherwise cause, and cut the impact noise that otherwise travels straight through a slab into the rooms above. Their weight is also what makes them work without adhesive or interlocking edges; laid flat and butted together, they simply don't move. Two honest warnings. The first is smell: fresh mats off-gas a strong rubber odor that is genuinely unpleasant in a closed, warm garage, and takes several weeks to fade. Laying them outdoors in the shade for a few days first, then running a fan in the space, shortens that considerably. The second is handling. A hundred pounds of floppy rubber is awkward in a way that dead weight isn't, and moving them alone is how people hurt their backs before ever lifting anything. Over a coated slab, they're the best flooring value in home fitness.
Pros
- Roughly a third the cost per square foot of purpose-marketed gym flooring tiles
- 3/4-inch thickness absorbs dropped dumbbells and protects a concrete slab from cracking
- 100 lb per mat means they stay put without adhesive, tape, or interlocking edges
- Dramatically reduces impact noise transmitted through a slab into the house
- Effectively indestructible under normal home gym use
Cons
- Strong rubber odor for the first several weeks, worse in a warm, closed garage
- Each mat weighs about 100 lb, making delivery and placement a genuine two-person job
- Cutting to fit requires a fresh utility knife blade and real effort
The Bottom Line
The most overlooked money-saver in home gym building. Identical material to gym flooring at a fraction of the price, sold in the farm supply aisle instead.
4. Where to Save and Where Not To
Building a gym on a budget is not about buying the cheapest version of everything. It's about knowing which items are commodities, where a cheap version and an expensive version are functionally identical, and which items are the ones holding a loaded barbell over your throat.
Save Freely On These
Plates. Cast iron is cast iron. A 45 lb plate from a budget brand and a 45 lb plate from a premium brand weigh the same, load the same, and last the same forever. The only meaningful differences are finish quality and how accurately the stated weight matches actual weight, and for home training a two percent variance is irrelevant. Buy the cheapest cast iron you can find per pound, and buy it used if possible.
Flooring. As covered above, horse stall mats and gym flooring are the same recycled rubber sold to different customers at very different prices. This is the single easiest few hundred dollars to save in a home gym build.
Accessories. Jump ropes, ab wheels, resistance bands, foam rollers, dip belts, and lifting straps have essentially no premium version worth paying for at home. The failure mode of a cheap ab wheel is that it breaks and you buy another one for eleven dollars.
Cardio, mostly. A $300 magnetic rower does not feel like a $1,000 air rower, but it delivers the same physiological stimulus if you work equally hard on it. Cardio equipment is where the price-to-benefit curve flattens fastest.
Do Not Save On These
The rack and its safeties. This is the only item on the list whose failure can seriously injure you. That does not mean buying an expensive rack — the Titan T-3 in this guide is a budget rack — it means buying from a manufacturer that publishes steel gauge, tube dimensions, and a rated capacity, and refusing to buy from one that doesn't. An unbranded rack with no published specs is not a bargain; it's an unknown holding a barbell above your neck.
The bench frame. Not the padding, the frame. A bench that shifts laterally under a heavy press is genuinely dangerous, and the difference between a stable bench and an unstable one is base geometry rather than price. Look for a wide, triangulated base and treat any bench built on a single narrow post as unsuitable for heavy work.
The bar, within reason. You don't need a $500 competition bar, but you should avoid the bottom of the market. A bar with no published tensile strength rating, a chrome-over-steel finish, and welded rather than rotating sleeves is a bar that can bend permanently under a load you'll reach within a year.
| Item | Budget Approach | Typical Cost |
|---|---|---|
| Power Rack | Buy budget brand, never unbranded | $400-500 |
| Olympic Bar | Mid-tier new, phosphate finish | $120-160 |
| 300 lb Cast Iron Plates | Buy used, cheapest per pound | $300-450 |
| Adjustable Bench | Wait for a sale, check base width | $130-180 |
| Rubber Flooring (96 sq ft) | Horse stall mats, farm supply store | $200-260 |
5. Garage Gym Flooring on a Budget
Most home gyms end up in a garage, and a garage slab is not a gym floor. Bare concrete is porous, cold, dusty, and brittle at the surface — a dropped plate chips it, and once the surface starts spalling the damage keeps spreading under every subsequent impact. The right budget approach is two layers: a coating that seals and protects the slab, and rubber matting on top that absorbs impact.
For the coating layer, a two-part epoxy kit is the durable choice and the one we'd recommend for a space that will see dropped weights and rolling equipment. Our best garage floor epoxy guide covers which kits survive real abuse and which peel within a season, and the application guide walks through the surface prep that determines whether a coating lasts a decade or a year. If epoxy is more project than you want, a quality one-part garage floor paint still seals the slab against moisture and dust for far less work — it just won't tolerate the same abuse.
For the rubber layer, 3/4-inch horse stall mats are the answer for the reasons covered in the review above: identical material to gym flooring, roughly a third the price. Ninety-six square feet — four 4x6 mats — covers a full rack and platform area with room to move around it. If you'd rather have interlocking edges and a cleaner installed look, our garage floor tile guide covers the interlocking systems, which cost more but install and remove far more easily than hundred-pound mats.
Let the Coating Cure First
Epoxy reaches full chemical cure days after it's dry to the touch. Laying hundred-pound rubber mats on a slab that's only surface-cured traps solvent, prints the mat texture permanently into the finish, and can lift the coating when you move the mats later. Check the manufacturer's full-cure window — usually five to seven days — and wait it out before any equipment goes down.
6. Space, Ceiling Height, and Climate
Floor Space
A power rack occupies roughly 4x4 feet, but the space it actually needs is closer to 8x8 — you need room to walk a loaded bar out of the rack, room to lie down on a bench, and room to swing a 7-foot barbell without hitting a wall or a car. Measure the full 8x8 footprint on the floor with tape before ordering anything. A dumbbell-and-bench setup works comfortably in about 6x6 feet, and kettlebell and band training needs about twenty square feet plus room to swing overhead.
Ceiling Height
This is the constraint that kills more garage gym plans than any other, and it's the one people discover after the rack arrives. Overhead pressing standing on a 3/4-inch mat needs roughly eight feet of clearance for most adults, and pull-ups from a rack-mounted bar need more than that. Standard attached-garage ceilings are often 8 feet exactly, which is enough for pressing and not enough for comfortable pull-ups. Measure from the top of the finished flooring, not the bare slab, and account for garage door tracks and opener rails, which frequently hang well below the ceiling itself.
Humidity and Rust
The thing nobody warns first-time garage gym owners about is what humidity does to bare iron. Cast iron plates, barbell knurling, and rack hardware all rust in an unconditioned garage, and in a humid climate it can start within weeks. Three things help enormously: a coated slab, which stops moisture wicking up through the concrete; a fan or dehumidifier during humid months — our dehumidifier guide covers units sized for exactly this kind of space, and they work as well in a garage as a basement; and a light wipe of 3-in-1 oil on the bar every month or two. That last habit takes two minutes and adds years to a barbell's life.
Air Quality and Ventilation
Garages accumulate dust, exhaust residue, and rubber off-gassing, and you'll be breathing hard in that air several times a week. Cross-ventilation with the door cracked handles most of it. In a fully closed space, or one attached to a house with poor separation, a filter unit is a reasonable addition — our home air purifier guide covers what actually removes particulates versus what just moves air around.
7. Buying Used Without Getting Burned
The used market is the single largest source of savings available to a budget home gym builder, and it's dramatically safer for some items than others. The rule is simple: buy used anything that is a solid piece of metal, and buy new anything with a mechanism.
Excellent used buys: cast iron plates, kettlebells, dumbbells, and steel racks. None of these have wearing parts. Surface rust on a used plate is cosmetic and comes off with a wire wheel and a coat of enamel; it has no effect on how the plate loads onto a bar. Used plates routinely sell for half of new pricing, and since plates are the second-largest line item in a barbell gym, that's often a $200-plus saving on a single transaction. Racks are the same story — check that all the hardware and safety pins are present, that no upright is visibly bent, and that the seller isn't missing the J-cups, which are expensive to replace piecemeal.
Risky used buys: anything selectorized, anything with a motor, and anything with bearings. Adjustable dumbbells with plastic selection mechanisms are frequently sold used precisely because the mechanism has started skipping. Treadmills and ellipticals are the classic trap — the reason someone is selling a five-year-old treadmill cheap is usually the motor or the belt, and both cost more to fix than the machine is worth. Rowers sit in the middle: magnetic rowers have little to fail, but check the seat rollers and the pull strap before buying.
What to inspect in person: on a bar, roll it on a flat surface and watch for a wobble that indicates a permanent bend, then spin the sleeves and listen for grinding. On a rack, sight down each upright for straightness and check the safety pins for deformation, which tells you the previous owner dropped heavy weight onto them repeatedly. On a bench, sit on it and shift your weight side to side; any lateral movement you can feel with bodyweight will be much worse under load.
Timing helps too. The used fitness market is heavily seasonal — supply spikes in late spring and early summer as people abandon January resolutions and clear out garages before moving season, and prices are correspondingly softest then. Buying a full plate set in June instead of January can easily be a thirty percent difference on identical iron.
8. Frequently Asked Questions
What is the best home gym equipment on a budget?
For a complete budget setup, the Titan Fitness T-3 power rack, a CAP OB-86PB Olympic bar, cast iron plates, and a FLYBIRD FB149 adjustable bench cover every fundamental barbell lift for roughly $900-1,100 total. If the budget is tighter, a single Yes4All cast iron kettlebell and a Bodylastics resistance band set deliver real training for under $150 combined.
How much does it cost to build a home gym on a budget?
A genuinely complete barbell home gym — rack, bar, 300 lb of plates, adjustable bench, and rubber flooring — costs roughly $1,200 to $1,600 new in 2026. A minimalist setup built around adjustable dumbbells, a bench, and bands runs $400-600. A single kettlebell and a set of bands, enough for real strength and conditioning work, costs under $150.
What should I buy first for a home gym?
Buy flooring and a rack first if you plan to lift barbells, because both are difficult to add later once equipment is in place. If you're not sure you'll stick with training, start with one kettlebell in the 35-45 lb range and a resistance band set — under $150 total, and both remain useful accessories even after you build out a full gym.
Is it cheaper to build a home gym or pay for a gym membership?
At a typical $40-60 monthly membership, a $1,400 budget home gym pays for itself in roughly two to three years, and most of the equipment holds significant resale value afterward. Cast iron plates, barbells, and racks depreciate very little, so the true cost of ownership is often far lower than the purchase price suggests.
Where is it safe to save money on gym equipment, and where is it not?
Save on plates, flooring, dumbbells, and accessories — cast iron is cast iron, and horse stall mats are identical to gym flooring at a third the price. Do not save on the power rack, the safety pins, or the bench frame, since those are the only pieces whose failure can injure you. A budget rack from a reputable brand is fine; an unbranded rack with no published steel gauge or weight rating is not.
How much space do I need for a budget home gym?
A full barbell setup needs about 8x8 feet of clear floor plus at least 8 feet of ceiling height for overhead pressing, and 9 feet if you plan to do any overhead work standing on a raised platform. A dumbbell-and-bench setup works in roughly 6x6 feet. Kettlebell and band training needs about 20 square feet.
9. Common Mistakes When Building a Budget Home Gym
Nearly every budget home gym we've seen go wrong went wrong in one of four specific ways, and all four are avoidable with an afternoon of planning.
Buying the Rack Before Measuring the Ceiling
This is the most expensive mistake on the list because a too-tall rack in a too-short garage is often unreturnable by the time you discover it. Measure from the finished floor height — including the thickness of any mats you plan to lay — to the lowest obstruction, which is usually the garage door track or opener rail rather than the ceiling itself. Then compare that to the rack's assembled height plus the clearance you need above the pull-up bar.
Skipping Flooring to Afford More Weight
Flooring feels like the least exciting purchase in a home gym build, so it's the one people defer. The result is a cracked, spalling slab, plates that chip on impact, and noise that carries through the whole house. Worse, adding flooring later means dismantling and moving everything. Buy less weight up front if you have to — plates are trivially easy to add later, and flooring is not.
Buying Cheap Dumbbells Twice
Spinlock dumbbells are genuinely great value, but only for people who will tolerate unscrewing collars between sets indefinitely. A large number of people buy them, train seriously for six months, get frustrated, and buy selectorized dumbbells anyway — having spent money twice. Be honest with yourself about how much the thirty-second weight change will bother you before choosing.
Trusting an Unbranded Rack Because the Price Was Good
Marketplace listings for racks with no manufacturer name, no published steel gauge, and no rated capacity are common and cheap. They're also the one place in a home gym where a failure has serious consequences. Budget brands like Titan publish their specs precisely because those specs are what they're selling. If a listing can't tell you the steel gauge and the weight rating, treat the absence as the answer.
Related Garage and Home Guides
Buyer's Guide
Best Garage Floor Epoxy
Seal the slab before the mats go down — the kits that survive dropped weights and rolling racks.
Top Pick
Best Garage Floor Tiles
Interlocking rubber and PVC systems if hundred-pound stall mats aren't practical for your space.
All Guides
Browse All Best Lists
Every hands-on tested guide we've published, organized by category.
The Bottom Line
The best home gym equipment on a budget is whatever combination gets you training consistently in the space you actually have. For a complete barbell setup, the Titan Fitness T-3 rack, a CAP OB-86PB bar, cast iron plates, and the FLYBIRD FB149 bench cover every fundamental lift for roughly a thousand dollars. If you're starting from nothing and want the highest return on the smallest spend, buy a Yes4All kettlebell and a Bodylastics band set today for under $150 and build outward from there.
Wherever you land, hold the line on two things: protect the floor before the weight arrives, and never buy a rack whose manufacturer won't publish its steel gauge and weight rating. Everything else in a budget gym is a preference. Those two are the difference between a gym you'll still be training in a decade from now and an expensive mistake.
More in Fitness & Outdoor Gear
Guides in this category that pair with what you just read.
About the Author
Alex Rivers, Home Improvement Editor
Alex has spent over a decade working on residential and light commercial property maintenance, and now tests every tool, coating and machine that appears in these guides personally.