The 7 Best Stud Finders in 2026
We tested 12 stud finders on standard drywall, thick plaster and lath, and walls with known pipes and wiring, then opened them up to check every reading. Only 7 earned a spot.
Alex Rivers
Home Improvement Editor
Last Updated
October 17, 2026
In This Guide
Most people believe stud finders are unreliable, and they are half right: cheap edge-detecting scanners genuinely are, because they infer a stud from a density change and get confused by seams, insulation, and anything else behind the drywall. Multi-sensor scanners work differently and are dramatically more accurate. Understanding that distinction is the whole game.
Our Picks at a Glance
The Short Answer
Franklin Sensors ProSensor 710+ (Best Overall). The stud finder that ends the argument about whether stud finders work. Thirteen sensors show the whole stud, and it is right essentially every time.
- Check Price
- Check Price
- Best for Detecting Wires Zircon MultiScanner X85 OneStep — Capacitive Multi-Mode, AC Wire Warning, Metal DetectionCheck Price
- Check Price
- Check Price
- Check Price
- Check Price
We may earn a commission when you buy through these links, at no extra cost to you. How we test
Best Overall
Franklin Sensors ProSensor 710+
1. How Stud Finders Actually Work
There are four genuinely different technologies sold as stud finders, and their accuracy differs enormously. Knowing which one you are holding explains both its strengths and the exact ways it will mislead you.
Magnetic
A strong magnet locates the ferrous screws or nails fastening drywall to the studs. This is direct physical evidence rather than inference, so it does not produce false positives from insulation or seams. It has no batteries and never drifts out of calibration. The cost is speed, since you must sweep to find a fastener, and it locates a point rather than a line, so you need two fasteners to establish the stud.
Capacitive Edge-Finding
The most common and cheapest electronic type. A single capacitive plate measures the dielectric constant of what is behind the wall, and a change indicates greater density. Because it measures change rather than absolute density, it must be calibrated on empty wall first, and placing it over a stud during calibration produces nonsense. It reports edges, so centering requires two scans from opposite directions.
Multi-Sensor
Several capacitive sensors arranged across the tool width read simultaneously and display wherever material is detected. Because it compares sensors against each other rather than against a calibration baseline, there is no calibration step and no wrong starting position. It shows the full width of a stud at once. This is why multi-sensor tools are dramatically more accurate in practice.
Radar Imaging
Low-power radar builds a picture of the material behind the wall, distinguishing studs, pipes, and wires by their shape and depth rather than simply signaling a hit. It provides far more information than any other type, at the cost of requiring interpretation, calibration to the wall type, and usually a connected smartphone.
The Numbers Don't Lie
16" or 24"
Standard stud spacing on center
1.5"
Actual width of a 2x4 stud face
3/4"
Typical capacitive scan depth
13
Sensors on a top multi-sensor tool
2. Why Stud Finders Give False Readings
The reputation stud finders have for being unreliable is mostly earned by one technology used incorrectly. Here is what actually causes bad readings and how to avoid each.
Calibrating over a stud. Capacitive edge-finders establish a baseline when you press the button, and if that starting point happens to be over a stud, the tool treats stud density as normal and reports the empty bays as anomalies. This produces readings that are exactly wrong, and it is the single most common failure. Multi-sensor tools eliminate it entirely because they have no calibration step.
Moving during calibration. Many scanners require you to hold still while the tool initializes. Starting to sweep too early corrupts the baseline. Press, wait for the indicator, then move.
Wall irregularities. Drywall seams with joint compound, patched areas, heavy texture, wallpaper, and paneling all change the dielectric behavior the tool measures. Any of them can produce a density reading indistinguishable from a stud.
Things that are not studs. Plumbing, electrical conduit, cable runs, fire blocking, metal corner bead, and dense insulation all read as material to a capacitive scanner. A hit is evidence that something is there, not evidence that it is wood.
Moisture and hand position. Capacitive sensing is affected by the dielectric of nearby material, which includes your own hand. Gripping the tool differently than during calibration, or scanning a wall with moisture behind it, both shift readings.
Batteries. A low battery degrades sensitivity long before the tool warns you or stops working, producing intermittent and inconsistent readings that feel like the tool has become unreliable. Fresh batteries fix a surprising number of stud finder complaints.
Always Verify Before You Commit
Whatever tool you use, confirm before hanging anything heavy. Two independent checks are worth the thirty seconds: scan from both directions and see whether the readings agree, and confirm with a magnetic finder that there is a fastener on the line. For a heavy mount, a small test hole with a thin bit inside the mounting footprint costs nothing to patch and tells you definitively whether there is wood there.
3. The 7 Best Stud Finders in 2026 — Tested & Ranked
We tested each tool on standard half-inch drywall, thick plaster and lath, and a purpose-built wall section containing a copper supply line, a cable run, and a steel stud, then verified every reading against the known layout. These seven earned their place.
At a Glance: How Our Picks Compare
| Product | Type | Rating | Best For |
|---|---|---|---|
| Franklin Sensors ProSensor 710+ | Multi-Sensor, 13 Sensors, No Calibration | 4.7 | Best Overall |
| Franklin Sensors ProSensor M210 | Multi-Sensor, 10 Sensors, Compact | 4.6 | Best Value Multi-Sensor |
| Zircon MultiScanner X85 OneStep | Capacitive Multi-Mode, AC Wire Warning, Metal Detection | 4.3 | Best for Detecting Wires |
| Bosch GMS 120 Wall Scanner | Professional Multi-Mode, Metal, Wood, Live Wire | 4.5 | Best Professional |
| Walabot DIY 2 | Radar Imaging, Smartphone-Connected, Wall Visualization | 4.1 | Best Wall Imaging |
| CH Hanson 03040 Magnetic Stud Finder | Magnetic, No Batteries, Locates Fasteners | 4.5 | Best Magnetic |
| Zircon StudSensor e50 | Capacitive Edge-Finding, DeepScan Mode, Wire Warning | 4.2 | Best Budget Electronic |
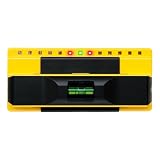
Best OverallFranklin Sensors ProSensor 710+
Multi-Sensor, 13 Sensors, No Calibration
Conventional stud finders use a single capacitive sensor and require you to sweep across the wall while the tool infers a density change and reports an edge. That process is why they need calibration on an empty section of wall, why placing one over a stud by accident ruins the reading, and why they get confused so easily. The ProSensor 710+ takes a completely different approach, using thirteen sensors across its width that read simultaneously and light up wherever material is detected. In practice you place it flat against the wall and it immediately shows you the full width of the stud, and often two studs at once. The difference in confidence is substantial. In our testing on standard half-inch drywall it identified stud locations and widths correctly on every attempt, including near electrical boxes and wall seams where edge-detecting scanners produced repeated false readings. There is no calibration step to get wrong, and no sweeping technique to learn, which removes the two most common sources of user error. It also detected reliably through thicker wall coverings than single-sensor tools managed. Two honest points. It costs several times what a basic scanner does, which is only worth it if you hang things often enough to care about being right. And it does not detect live wiring or plumbing, so it tells you where the wood is rather than where it is safe to drill.
Pros
- Thirteen independent sensors display the entire stud width at once rather than guessing at edges
- No calibration step, so you can place it anywhere including directly over a stud
- Detects consistently through thicker wall coverings than single-sensor scanners
- Shows multiple studs simultaneously if they fall within the tool width
- Genuinely accurate in our testing, with essentially no false positives on standard drywall
Cons
- Costs several times what a basic edge-finding scanner does
- Does not detect live wiring or pipes, so it should be paired with awareness of what is in the wall
- Physically wide, which makes it awkward in tight corners
The Bottom Line
The stud finder that ends the argument about whether stud finders work. Thirteen sensors show the whole stud, and it is right essentially every time.

Best Value Multi-SensorFranklin Sensors ProSensor M210
Multi-Sensor, 10 Sensors, Compact
The ProSensor 710+ is excellent and more tool than many homeowners need, and the M210 exists to fill that gap. It uses the same fundamental multi-sensor design, ten sensors reading simultaneously across the tool width, which means the same immediate, calibration-free operation and the same ability to show the full width of a stud rather than an inferred edge. In our testing its accuracy on standard drywall was essentially indistinguishable from the flagship. Where it differs is size and reach. The narrower sensor array shows less of the wall at once, so you may need one extra placement to find a second stud, and detection depth is marginally shallower, which matters only on unusually thick wall coverings. In exchange it is considerably more compact, which makes it genuinely easier to use in a corner, behind a toilet, or in any of the awkward positions where things actually need hanging. It also costs meaningfully less. For someone hanging shelves, mounting a television, or installing cabinets occasionally, this is the more sensible purchase, and the flagship is worth the difference mainly for people doing this daily. The same caveat applies as to every stud finder in this class: it detects material density, not electricity, so it will show you a stud and tell you nothing about a cable stapled to the side of it.
Pros
- Same multi-sensor approach as the flagship at a meaningfully lower price
- More compact and easier to use in corners and tight spaces
- No calibration required, so results are immediate and consistent
- Shows stud width rather than just an edge, which makes centering easy
- Simple single-button operation with a clear LED display
Cons
- Slightly narrower sensor array than the 710+, so it shows less wall at once
- Still does not detect wiring or plumbing
- Detection depth is a little shallower than the flagship model
The Bottom Line
Most of the flagship accuracy in a smaller, cheaper package. For a homeowner rather than a contractor, this is the sensible buy.

Best for Detecting WiresZircon MultiScanner X85 OneStep
Capacitive Multi-Mode, AC Wire Warning, Metal Detection
Multi-sensor stud finders are more accurate at finding wood, and they are completely blind to electricity. The Zircon X85 trades some stud-finding precision for a genuinely different capability: it warns when it detects live AC wiring behind the surface, and it has a separate metal scanning mode that distinguishes ferrous metal like nails and steel studs from non-ferrous metal like copper pipe. For anyone drilling into a wall near a kitchen, a bathroom, or a run of outlets, that information changes what you do next. In our testing the wire warning worked reliably on energized circuits at typical depths, and the metal mode correctly identified a copper supply line we had deliberately placed. The SpotLite pointer, which projects a spot of light onto the wall at the detected location, is more useful than a simple LED because it marks the spot without you needing to hold a pencil against the tool. Two limitations matter. It uses the conventional capacitive edge-detecting approach, so it needs calibration on a clear section of wall and it produced more false readings than the Franklin tools during our testing, particularly near seams. And critically, it only detects energized wiring, so a circuit switched off at the breaker is invisible to it. Treat the warning as useful information rather than as a guarantee of safety.
Pros
- Detects live AC wiring and warns before you drill into it, which multi-sensor scanners do not
- Separate modes for wood studs, deep scanning, and metal detection
- Metal scan distinguishes ferrous from non-ferrous, useful for finding copper pipe versus nails
- SpotLite pointer projects the target location directly onto the wall
- Well-established and widely available with good documentation
Cons
- Edge-detecting design requires calibration and is more prone to false readings than multi-sensor tools
- Live wire detection only finds energized wiring, so a switched-off circuit reads as clear
- Learning to use it accurately takes practice and a consistent technique
The Bottom Line
The one to own if you worry about drilling into a wire. Less accurate at finding studs than multi-sensor tools, and it detects things they cannot.

Best ProfessionalBosch GMS 120 Wall Scanner
Professional Multi-Mode, Metal, Wood, Live Wire
Where consumer stud finders answer one question, the Bosch GMS 120 is built to answer three: where is the wood, where is the metal, and where is the electricity. Its three distinct modes are clearly indicated rather than buried in a button sequence, which matters because the most common failure with multi-mode scanners is using the wrong mode without realizing it. In our testing the metal detection mode was the standout, identifying both ferrous and non-ferrous objects at greater depth than any consumer scanner in the group, which is genuinely useful when locating conduit, rebar in masonry, or a copper line behind a tiled wall. The display shows signal strength rather than a binary result, which lets you distinguish a strong central reading from a weak edge one and effectively judge where the center of an object sits. The ring light marks the target on the wall directly, so you mark exactly where the tool detected rather than approximating. Build quality is clearly aimed at daily professional use. The reservations are price and learning curve. It costs considerably more than consumer tools, and getting reliable results requires understanding what each mode does and does not detect. For wood stud finding specifically, it remains an edge-detecting design and is less immediate than the Franklin multi-sensor tools, which show the full stud width at a glance.
Pros
- Three distinct detection modes for metal, wood, and live wiring with clear mode indication
- Detects ferrous and non-ferrous metal deeper than most consumer scanners
- Audible signal plus a ring light that marks the target directly on the wall
- Robust construction built for daily professional use
- Clear display showing detection strength rather than a simple found or not found
Cons
- Expensive relative to consumer stud finders
- Requires understanding the modes to get accurate results
- Still an edge-detecting design for wood, so it is less immediate than multi-sensor tools
The Bottom Line
The professional multi-mode scanner. Deep metal detection and mode clarity make it the choice when you need to know what is behind the wall, not just where.

Best Wall ImagingWalabot DIY 2
Radar Imaging, Smartphone-Connected, Wall Visualization
Every other tool in this guide tells you that something is behind the wall at a particular point. The Walabot DIY 2 shows you a picture of it. Using low-power radar and a connected smartphone app, it renders a visual representation of the material behind the surface, in which a stud appears as a long vertical band, a pipe as a distinct line running horizontally or vertically, and wiring as a thinner trace. For anyone about to cut a large hole in an unfamiliar wall, that visual context is a genuinely different kind of information than a beep. In our testing it correctly rendered a stud bay containing both a copper supply line and a cable run, which no other tool in the group communicated as clearly. Pan mode, which stitches together a wider image as you move the device, is particularly useful for mapping a whole area before planning a cut. Its depth capability also exceeded most capacitive scanners. The reservations are real and worth weighing. It requires a compatible phone and an app, which is meaningfully more friction than picking up a standalone tool for a two-minute job. The image requires interpretation, and it is genuinely possible to misread it without experience. And calibration for the specific wall type matters more here than with simpler tools. Treat it as an investigative instrument rather than a quick stud finder.
Pros
- Radar imaging shows an actual visual map of what is behind the wall on your phone
- Distinguishes studs, pipes, and wires by their appearance rather than just signaling a hit
- Genuinely useful for understanding an unfamiliar wall before cutting into it
- Detects deeper than most capacitive scanners, including through some thicker materials
- Pan mode builds a wider picture as you move it across the wall
Cons
- Requires a compatible smartphone and an app, which is more setup than picking up a tool
- Interpreting the image takes practice, and it is easy to misread
- Calibration on the specific wall type is needed for reliable results
The Bottom Line
The only tool here that shows you a picture rather than a beep. Best when you need to understand a wall, not just find a stud.

Best MagneticCH Hanson 03040 Magnetic Stud Finder
Magnetic, No Batteries, Locates Fasteners
Electronic stud finders infer the presence of a stud from a change in density behind the wall. A magnetic stud finder does something more direct: it locates the ferrous screws or nails that fasten the drywall to the stud. That is physical evidence rather than inference, and it is why many carpenters carry one alongside an electronic tool. The CH Hanson uses strong rare-earth magnets that grip the wall when they find a fastener and stay there, marking the spot and leaving both your hands free. In our testing it was the most reliably correct tool in the guide on standard drywall, though also the slowest, because finding a screw requires sweeping the wall until the magnet catches. Its advantages compound in awkward situations. There are no batteries to be dead when you need it, no calibration to get wrong, nothing to drift out of accuracy over years in a drawer, and it works on plaster and other surfaces where capacitive scanners struggle. It costs very little. The limitation is what it tells you. A single fastener locates a point on a stud, not the stud line, so the standard method is to find two fasteners vertically apart and draw a line between them, which gives you the stud center. It also detects only ferrous metal, so it says nothing about wiring or copper plumbing.
Pros
- Finds the actual screws and nails holding drywall to studs, which is direct evidence rather than inference
- No batteries, no calibration, and nothing to fail or drift out of accuracy
- Extremely cheap and small enough to keep in a drawer or a pocket
- Strong rare-earth magnets that hold themselves on the wall, leaving both hands free
- Works on plaster and other surfaces where electronic scanners struggle
Cons
- Finds fasteners rather than studs, so you must find two to establish the line
- Slower to use than an electronic scanner, requiring sweeping to locate a screw
- Cannot detect anything other than ferrous metal, so no wire or pipe awareness
The Bottom Line
The most trustworthy result here for the least money. It finds actual screws, which is physical evidence rather than an electronic guess.

Best Budget ElectronicZircon StudSensor e50
Capacitive Edge-Finding, DeepScan Mode, Wire Warning
The StudSensor is the tool that shaped most people opinion of stud finders, for better and worse. It is cheap, available everywhere, and simple to operate, and it works reasonably well within its limits. It also has all the characteristic weaknesses of capacitive edge detection: it requires calibration on a clear section of wall, it gets confused by seams and irregularities, and it reports an edge rather than a stud width, so centering requires scanning from both directions and splitting the difference. In our testing on standard drywall it found studs correctly most of the time, with occasional false readings near electrical boxes and wall joints that a multi-sensor tool did not produce. DeepScan mode roughly doubles the scanning depth, which helps on thicker wall coverings, and WireWarning provides an alert on energized AC wiring, which is a meaningful safety feature at this price. The tool is small enough to live permanently in a toolbox and cheap enough that having one is clearly better than having none. Where it struggles is exactly where the technology struggles: plaster, heavy texture, wallpaper over multiple layers, and any wall with unusual construction. If you use it, calibrate on a section of wall you are confident is empty, scan from both directions, and verify with a small test hole before committing to a heavy mount.
Pros
- Very inexpensive and widely available at any hardware store
- DeepScan mode doubles scanning depth for thicker wall coverings
- WireWarning detects live AC wiring during scanning
- Simple single-button operation that anyone can pick up immediately
- Small and light enough to keep in a toolbox permanently
Cons
- Edge-detecting design with the false-reading problems that characterize the type
- Requires careful calibration on a clear section of wall before each scan
- Struggles noticeably on plaster, textured walls, and thick coverings
The Bottom Line
The stud finder most people already own. It works if you calibrate carefully and verify, and it will frustrate you if you do not.
4. Confirming a Stud Without Relying on the Tool
The most reliable approach combines an electronic reading with physical evidence, and the physical checks take almost no time.
Use standard spacing to predict. Studs in American residential framing are almost always spaced 16 inches on center, and sometimes 24 inches in newer or non-load-bearing walls. Once you find one confirmed stud, measure 16 inches to find the next, and if your measurement lands on another detected stud, you have strong corroboration for both.
Start from a known reference. There is always a stud on each side of a window and a door, and studs typically sit at the corners of a room and beside electrical boxes, since boxes are nailed to studs. Measuring from an outlet is one of the fastest ways to establish a starting point, remembering that the box is beside the stud rather than centered on it.
Confirm with a magnet. A magnetic finder locates the actual screws holding the drywall. Finding two fasteners vertically apart and drawing a line through them gives you the stud line directly, and it corroborates whatever an electronic tool reported.
Knock, but do not trust it alone. Tapping the wall produces a duller, higher sound over a stud and a hollower one between. It is a reasonable rough guide and a poor final answer, particularly on plaster or double-layer drywall.
Drill a small test hole where the mount will cover it. A 1/16-inch bit inside the footprint of the bracket you are installing tells you definitively whether there is wood behind. If you miss, the hole is invisible once mounted and takes seconds to fill anyway. For anything heavy, this is the check worth doing.
Remember the stud is 1.5 inches wide. A 2x4 presents a face only an inch and a half across, and a lag bolt near the edge can split the wood or barely catch. Find the center rather than the edge, which is exactly the advantage multi-sensor tools provide by showing full width.
5. Plaster, Lath, and Other Difficult Walls
Standard drywall is the easy case. Older and unusual wall construction defeats most electronic scanners, and different techniques become necessary.
Plaster and Wood Lath
Plaster over wood lath is the hardest common wall for a capacitive scanner. The lath itself is wood, running horizontally across the whole wall at close spacing, which means the scanner sees dense material almost everywhere. Multi-sensor tools do better because they compare relative density, but the reliable method in plaster is a magnetic finder locating the nails that fasten lath to studs, or measuring from a known reference like a door frame.
Plaster Over Metal Lath
Worse still. Metal lath forms a continuous conductive layer that blocks capacitive scanning entirely and saturates metal detection. Magnetic finders are also overwhelmed. Here the practical approaches are measuring from known references, using a radar imaging tool, or drilling small exploratory holes in an inconspicuous area.
Tile and Backer Board
Tile over cement backer board is dense and thick, exceeding the scanning depth of most consumer tools. Deep scan modes help, and this is a case where a professional scanner with greater depth or a radar imager earns its price. Locating studs before tiling and recording the positions is far easier than finding them afterward.
Paneling and Multiple Layers
Wood paneling, or drywall installed over old plaster, puts extra thickness between the sensor and the stud. Use a deep scan mode if available, and expect reduced accuracy. Magnetic finders often still work if the outer layer is fastened to the studs.
Metal Stud Framing
Common in commercial construction and some newer homes. Metal studs are thin and detected easily by any tool with a metal mode, and by magnetic finders. The important difference is fastening: metal studs require self-tapping screws or toggle anchors, and lag bolts intended for wood will not hold.
6. Wires, Pipes, and Not Drilling Into Them
The stud finder answers where the wood is. Whether it is safe to drill there is a separate question, and it deserves more attention than it usually gets.
Live wire detection has a critical limitation. Scanners that warn about AC wiring detect the electromagnetic field of an energized conductor. A circuit switched off at the breaker produces no field and reads as clear, which means the absence of a warning is not proof that no wiring is present. Treat a warning as reliable and its absence as inconclusive.
Wiring runs where you would expect it. Cables typically run vertically between outlets and switches, and horizontally within stud bays a foot or so above the floor or near outlet height. Drilling directly above or below an outlet or switch is statistically the most likely place to hit a cable, and it is worth avoiding regardless of what a scanner says.
Plumbing concentrates in specific walls. Supply lines and drains run in walls behind and beside kitchens, bathrooms, and laundry areas, and vertically through the wall cavity between floors. A wall that backs onto a bathroom deserves considerably more caution than an interior bedroom wall.
Limit your drilling depth. Drywall is half an inch thick, so a screw needs to penetrate that plus enough into the stud to hold. Setting a depth stop or a piece of tape on the bit at the depth you actually need prevents driving several inches into a cavity you have not inspected.
Nail plates are a good sign and a hazard. Code requires metal protective plates where wiring or plumbing passes close to the face of a stud. A metal detection hit on the face of a stud may well be a nail plate protecting something behind it, which is a clear signal to move.
When you are genuinely unsure, look. Removing an outlet cover, checking the basement or crawl space below, or looking in the attic above will often reveal exactly where lines run into a wall. Five minutes of investigation is cheaper than a repair.
Before You Buy
Also Needed for This Job
7. Frequently Asked Questions
What is the best stud finder?
The Franklin Sensors ProSensor 710+ is the most accurate, using thirteen sensors to display the full width of a stud at once with no calibration step. For a smaller, cheaper version of the same technology, the ProSensor M210 is the sensible homeowner choice. If you want warning about live wiring, the Zircon MultiScanner X85 adds that at some cost in stud-finding precision.
Why is my stud finder inaccurate?
Usually because it is a capacitive edge-finder that was calibrated while sitting over a stud, which makes it report the empty bays as studs. Other common causes are moving during calibration, wall seams and texture, low batteries degrading sensitivity, and hitting pipes, conduit, or fire blocking rather than wood. Multi-sensor tools avoid most of these.
How far apart are studs in a wall?
Almost always 16 inches on center in American residential framing, and sometimes 24 inches in newer construction or non-load-bearing walls. Once you confirm one stud, measuring 16 inches to the next and finding a detection there is strong corroboration. There is also always a stud beside every window, door, and room corner.
Do magnetic stud finders work better than electronic ones?
They are more trustworthy in a specific way: they locate the actual screws holding drywall to studs, which is physical evidence rather than an inferred density reading. They are slower, they find a point rather than a line so you need two fasteners, and they detect nothing but ferrous metal. Many carpenters carry both and use the magnet to confirm the electronic reading.
Will a stud finder work on plaster walls?
Poorly. Plaster over wood lath presents dense material almost everywhere, which confuses capacitive scanners, and plaster over metal lath blocks them entirely. Magnetic finders locating lath nails work better on wood lath, and measuring from known references like door frames is often the most reliable approach. Radar imaging tools handle plaster better than capacitive ones.
Can a stud finder detect electrical wires?
Some can, but only energized ones. Live wire detection works by sensing the electromagnetic field around an AC conductor, so a circuit switched off at the breaker reads as clear. Treat a warning as reliable and treat its absence as inconclusive, and avoid drilling directly above or below outlets and switches where cables commonly run.
8. Common Stud Finder Mistakes
Nearly every stud finder complaint traces to one of these, and all four are easy to avoid once you know about them.
Calibrating While Sitting Over a Stud
Capacitive edge-finders set their baseline where you press the button. Do that over a stud and the tool treats stud density as normal, then flags the empty bays instead. The result is readings that are precisely backwards, and it is the single most common cause of a stud finder that seems broken. Multi-sensor tools have no calibration step at all.
Assuming a Detection Means Wood
Capacitive scanners detect density, not species. Plumbing, conduit, cable runs, fire blocking, metal corner bead, and packed insulation all register. A hit tells you something is there, and driving a lag bolt into a copper supply line because the tool beeped is an expensive way to learn the difference.
Aiming for the Edge Instead of the Center
A 2x4 presents a face only an inch and a half wide, and edge-finding scanners report an edge rather than a center. A fastener placed near the edge can split the stud or barely bite. Scan from both directions, mark both edges, and drill the middle, or use a multi-sensor tool that shows the full width directly.
Trusting a Single Reading for a Heavy Mount
A television, a heavy shelf, or a cabinet coming off the wall is expensive and dangerous. Corroborate with a second method before committing: check that spacing from a confirmed stud is 16 inches, verify with a magnet that a fastener sits on the line, or drill a small test hole inside the mounting footprint where it will be hidden.
Everything Else About Stud Finders
Related Tool & DIY Guides
Buyer's Guide
Best Laser Levels
Once you have found the studs, get the shelf actually level across the wall.
Buyer's Guide
Best Cordless Drills for Home Use
Lightweight drills and combo kits for hanging, mounting, and everyday DIY.
All Guides
Browse All Best Lists
Every hands-on tested guide we have published, organized by category.
The Bottom Line
The best stud finder is a multi-sensor tool, because showing the full width of a stud at once eliminates both the calibration error and the edge-guessing that make cheap scanners frustrating. The Franklin Sensors ProSensor 710+ is the most capable, the M210 is the sensible homeowner version, and a CH Hanson magnetic finder costs almost nothing and confirms the answer with physical evidence.
Whatever you use, corroborate before hanging anything heavy. Sixteen-inch spacing, a magnet on the line, and a small test hole inside the bracket footprint take under a minute between them.
More in Tools & Equipment
Guides in this category that pair with what you just read.
About the Author
Alex Rivers, Home Improvement Editor
Alex has spent over a decade working on residential and light commercial property maintenance, and now tests every tool, coating and machine that appears in these guides personally.