The 7 Best Drywall Sanders in 2026
We sanded an entire room of fresh joint compound with each machine and weighed the dust that escaped collection. Reach, arm fatigue and edge access measured on every one.
Alex Rivers
Home Improvement Editor
Last Updated
October 17, 2026
In This Guide
Sanding drywall by hand is slow, and sanding it with a power sander without proper extraction fills a house with an extraordinarily fine dust that finds its way into everything for weeks. A good drywall sander solves both problems at once, and how well it captures dust matters considerably more than how fast it sands.
Our Picks at a Glance
The Short Answer
Festool PLANEX LHS 2 225 (Best Overall). The professional standard, and the dust extraction is why. If you finish drywall for a living, nothing else compares.
- Check Price
- Check Price
- Best Budget WEN 6369 Variable Speed Drywall Sander — Long Reach, 5 Amp, Variable Speed, Dust Hose IncludedCheck Price
- Check Price
- Check Price
- Check Price
- Check Price
We may earn a commission when you buy through these links, at no extra cost to you. How we test
Best Overall
Festool PLANEX LHS 2 225
1. The Dust Problem Is the Whole Problem
Joint compound dust behaves differently from sawdust, and understanding why explains everything about how these tools are designed.
It Is Extraordinarily Fine
Sanded compound produces particles far smaller than wood dust, light enough to remain airborne for hours and to travel through a house on the smallest air current. It settles on every surface in every room, including ones with the door closed.
Ordinary Vacuums Redistribute It
A shop vacuum with standard filtration captures the coarse fraction and blows the fine fraction straight back into the room through the exhaust. Without a fine dust or HEPA filter, using a vacuum can make the airborne situation worse rather than better.
It Gets Into Everything Mechanical
Compound dust is mildly abrasive and finds its way into computer fans, appliance vents, door hinges and tool bearings. Damage from a badly managed drywall sanding job shows up weeks later in unrelated equipment.
Silica Content Makes It a Health Matter
Many joint compounds contain crystalline silica, and the dust from sanding is in the respirable size range. This is not merely a nuisance, and a rated respirator rather than a paper mask is the correct precaution.
Extraction Beats Cleanup Every Time
A machine that captures ninety percent of the dust at the head saves hours of cleaning and keeps the rest of the house usable. This is why extraction performance, not sanding speed, is the specification that should decide the purchase.
Why Extraction Matters
9 in
Standard drywall sanding disc size
120-150
Grit range for finishing compound
HEPA
Filter grade the vacuum actually needs
Hours
How long fine dust stays airborne
2. Pole Sanders, Powered Sanders and Hand Tools
Three quite different tools share this name, and the right one depends entirely on the size of the job.
Manual pole sanders are cheap and slow. A sanding head on a swivel at the end of a pole, with a screen or paper attached. They cost very little, need no power, and sanding a whole room with one is genuinely hard work.
Powered long reach sanders are the room-sized answer. A rotating disc on the end of an extension with dust extraction built in. They turn a two day hand sanding job into a few hours, and they are what every professional uses.
Hand held drywall sanders handle detail and patches. Round swivel-head tools for small repairs, edges and corners. Every job needs some of this work regardless of what powered machine you own.
Random orbit sanders are a poor substitute. They can sand compound, but the small pad, the lack of reach, and the aggressive cut make it slow and easy to dig through the paper face of the board.
Wet sanding is the no-dust alternative. A damp sponge dissolves and smooths compound rather than abrading it, producing no airborne dust at all. It is slower, it leaves a slightly softer surface, and it cannot handle heavy build-up, but in an occupied house with no way to isolate the room it is often the correct choice.
Corner tools exist and are worth having. Inside corners are where most amateur drywall work betrays itself, because no round sander reaches fully into them. An angled corner sanding tool costs very little and finishes the one area that is visible from everywhere in the room.
Most jobs need two tools. A powered machine for the flats and a hand sander for corners, edges and around fittings. Buying only the powered machine leaves you improvising in exactly the places where the finish is most visible.
3. The 7 Best Drywall Sanders in 2026 — Tested & Ranked
We sanded an identical room of freshly finished drywall with each machine, weighing the dust captured against the dust deposited on pre-weighed collection sheets around the room. We timed a full ceiling with each, recorded arm fatigue across the session, and assessed how close each could work to corners and edges without switching tools. These seven earned their place.
At a Glance: How Our Picks Compare
| Product | Type | Rating | Best For |
|---|---|---|---|
| Festool PLANEX LHS 2 225 | Long Reach, Brushless, Variable Speed, Vacuum Required | 4.8 | Best Overall |
| Porter-Cable 7800 | Long Reach, 4.7 Amp, Variable Speed, Vacuum Ready | 4.5 | Best Value Professional |
| WEN 6369 Variable Speed Drywall Sander | Long Reach, 5 Amp, Variable Speed, Dust Hose Included | 4.3 | Best Budget |
| YATTICH YT-916 Drywall Sander | Long Reach, 7 Amp, LED Ring, Foldable Handle | 4.4 | Best Lighting |
| ALEKO 690E Electric Drywall Sander | Long Reach, 6.5 Amp, Vacuum Included, Kit | 4.2 | Best Complete Kit |
| DEWALT DWE7800 Drywall Sander | Long Reach, 7.5 Amp, Brushless Option, Vacuum Ready | 4.5 | Best Power |
| Radius 360 Air Hand Sander | Hand Held, 9 in Round, Swivel Head, Vacuum Port | 4.6 | Best Hand Sander |

Best OverallFestool PLANEX LHS 2 225
Long Reach, Brushless, Variable Speed, Vacuum Required
The measure of a drywall sander is not how quickly it removes compound but how much of the resulting dust it fails to capture, because joint compound dust is astonishingly fine and gets everywhere. We weighed the dust escaping each machine over an identical room, and the Festool PLANEX captured a substantially higher fraction than anything else, to the point where the room remained usable during sanding rather than requiring sheeting off. For a professional working in an occupied house, that difference alone justifies the machine. The engineering behind it is thorough. The head articulates on a joint that lets it follow the wall surface without conscious effort, so the sander stays flat as your arms move, which both improves the finish and dramatically reduces the fatigue of holding a long tool at an angle. A segmented brush ring can be opened on one side to sand into a corner or up to a ceiling line without swapping to a different tool. Variable speed gives real control over how aggressive the machine is on soft compound. The obstacles are cost and dependency. It is priced as professional equipment, it requires a matched extractor to achieve its extraction figures, and the combination represents a serious investment that makes no sense for a single renovation.
Pros
- Best dust extraction of any machine tested by a clear margin
- Segmented brush head allows sanding into corners without switching tools
- Very well balanced despite the reach, reducing arm fatigue markedly
- Variable speed with genuine control over aggressiveness
- Sanding head articulates to follow the surface automatically
Cons
- Extremely expensive, priced for professional finishers
- Requires a compatible extractor to work as intended, adding further cost
- Long machine is awkward to store and transport
The Bottom Line
The professional standard, and the dust extraction is why. If you finish drywall for a living, nothing else compares.

Best Value ProfessionalPorter-Cable 7800
Long Reach, 4.7 Amp, Variable Speed, Vacuum Ready
For a very long time this was the default powered drywall sander on job sites, and it retains that position for straightforward reasons: it works, it is affordable, and consumables are available everywhere. The articulating head follows the wall as your arms move, variable speed lets you back off on soft compound to avoid digging in, and dust extraction through a standard shop vacuum captures most of what the sanding produces. That combination covers the job properly without any single standout feature. Where it shows its age is weight. It is heavier than the premium machines and the balance is less refined, which is a minor observation on a small job and a significant one across a full day of ceilings. The vacuum hose attached to a long tool adds drag that compounds the effect, and by mid afternoon your shoulders will know about it. Extraction is good rather than exceptional. In our dust weighing the escape was noticeably higher than the Festool, though far better than any handheld option, and the room still needed a proper clean afterwards. Sanding discs are inexpensive and stocked widely, which matters because drywall sanding gets through them. For a contractor or a serious renovator, this is the sensible purchase.
Pros
- Well proven professional machine at a fraction of premium pricing
- Variable speed across a genuinely useful range
- Articulating head follows the wall surface
- Good dust extraction when paired with a decent shop vacuum
- Widely available with cheap and easy sanding discs
Cons
- Heavier than premium machines, which tells over a full day
- Extraction is good rather than exceptional
- Vacuum hose adds drag that makes the tool feel heavier still
The Bottom Line
The machine most drywall contractors actually own. Not the best at anything, competent at everything, sensibly priced.
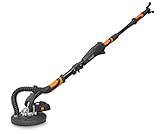
Best BudgetWEN 6369 Variable Speed Drywall Sander
Long Reach, 5 Amp, Variable Speed, Dust Hose Included
A powered drywall sander is a tool most people need exactly once, during a renovation, after which it goes into a cupboard. Buying professional equipment for that is difficult to justify, and this machine exists precisely for the one-project buyer. It has the essential features — full length reach, variable speed, an articulating head and a dust port — at a price that competes with renting for a week. On our full room test it sanded the compound down properly and produced an acceptable finish, which is the whole requirement. The compromises are weight, balance and dust. It is heavy, and the balance places more of that weight further from your hands than the better machines do, so fatigue arrives sooner. The supplied dust bag is close to useless: in our weighing it let a large fraction escape, and using it means a house full of compound dust regardless of the machine being powered. Connecting a shop vacuum instead transforms the result and should be treated as mandatory rather than optional. Vibration is higher than professional machines and the fit and finish is basic throughout. None of that stops it doing the job. For one renovation, it is a rational purchase; for repeated professional use it would not survive.
Pros
- Very low price for a full length powered drywall sander
- Variable speed control included
- Comes with a dust hose and collection bag
- Adequate performance for a single renovation project
- Standard 9 inch discs that are cheap and universally available
Cons
- Heavy and poorly balanced compared with professional machines
- Dust collection through the supplied bag is weak; a vacuum is essential
- Build quality is basic and vibration is noticeable
The Bottom Line
Gets a renovation done for very little money. Connect a real vacuum and accept the weight.
Best LightingYATTICH YT-916 Drywall Sander
Long Reach, 7 Amp, LED Ring, Foldable Handle
The reason drywall finishing looks perfect until the paint goes on is that ordinary room lighting is diffuse and hides surface irregularities completely. Professionals use a work light held at a shallow angle to the wall for exactly this reason, because raking light casts shadows from ridges and hollows that are otherwise invisible. The YATTICH builds a ring of LEDs around the sanding head, so the light is always at the right angle right where you are working. It sounds like a marketing feature and it is genuinely useful, particularly for someone doing this for the first time who does not yet know what to look for. Beyond the light, the machine is a competent mid-range tool. The motor is strong, the speed range is useful, the head detaches for sanding close to edges and corners, and the folding handle makes a long awkward tool storable. A generous set of discs is included, which offsets some of the price. The weaknesses are familiar. It is heavier than it appears once assembled, dust collection through the bag is unremarkable and needs a vacuum to be acceptable, and the LED ring is one more thing that can stop working. As a first drywall sander for a homeowner, it is a strong choice.
Pros
- LED ring around the sanding head reveals imperfections you would otherwise miss
- Foldable handle makes storage and transport far easier
- Strong motor with good speed range
- Detachable head for close-to-edge sanding
- Includes a generous set of sanding discs
Cons
- Heavier than it looks once the extension is fitted
- Dust collection is average and needs a vacuum
- LED adds another component that can fail
The Bottom Line
The light is not a gimmick. Raking illumination shows the ridges you cannot see under normal room lighting.
Best Complete KitALEKO 690E Electric Drywall Sander
Long Reach, 6.5 Amp, Vacuum Included, Kit
Every drywall sander review eventually arrives at the same caveat: connect a shop vacuum, because the bag is inadequate. For a buyer who does not own a shop vacuum, that turns a modest tool purchase into two, and the vacuum often costs more than the sander. The ALEKO kit removes that problem by including one, along with hose, discs and a case, which makes it a genuine single purchase solution for a renovation. On our full room test it performed adequately, sanding the compound properly with reasonable dust capture. The significant caution concerns the vacuum itself. Joint compound dust is extremely fine, and a vacuum with ordinary filtration will collect the coarse fraction and blow the fine fraction straight back into the room, which is worse than it sounds because that is the fraction that hangs in the air and settles on everything for a fortnight. Fitting a fine dust or HEPA filter bag before starting makes a substantial difference and is a small additional cost. Beyond that, the tooling is entry level throughout, the assembled weight with a vacuum in tow is considerable, and refinement is limited. For one project by someone starting with nothing, it is a practical package.
Pros
- Supplied with its own vacuum unit rather than requiring a separate purchase
- Complete kit with discs, hose and case
- Reasonable value considering the vacuum is included
- Adequate power and speed range for household work
- Good option for someone with no existing shop vacuum
Cons
- Included vacuum is basic and its filtration is not fine enough for compound dust
- Overall build quality is entry level
- Heavy assembled weight with the vacuum in tow
The Bottom Line
The all-in-one answer if you own no vacuum. Consider upgrading the filter before you start.

Best PowerDEWALT DWE7800 Drywall Sander
Long Reach, 7.5 Amp, Brushless Option, Vacuum Ready
Most drywall sanding is light work in the sense that joint compound is soft, but there is a specific situation where power matters: a heavily built up joint, a textured ceiling being flattened, or old compound that has fully cured and hardened. Underpowered machines slow noticeably in that material and the sanding disc loads up as a result. The DEWALT has the strongest motor here and it simply does not bog, holding speed through material that made the budget machines labour. On our ceiling section, where the compound was thickest, it was appreciably faster. Construction matches the motor. The housing and extension are built to survive job site treatment rather than careful workshop handling, the grips are positioned sensibly for a tool held at an angle for long periods, and the speed control has a genuinely usable low setting for delicate work near an edge. Extraction is effective with a suitable vacuum connected. The costs are money and mass. It sits well above mid range machines on price, and the motor that makes it capable also makes it heavy, which over a full day of ceilings is felt. Like every machine here except the Festool, it needs a good vacuum to achieve acceptable dust capture.
Pros
- Strongest motor in the group, unaffected by heavy compound
- Robust construction that stands up to job site handling
- Good speed control with a usable low setting
- Effective extraction when connected to a suitable vacuum
- Comfortable grips positioned for extended use
Cons
- Expensive relative to mid range machines
- Heavy, which is the price of the motor
- Requires a good vacuum to reach its extraction potential
The Bottom Line
The one that does not slow down. For heavy compound and long days, the extra power is not wasted.
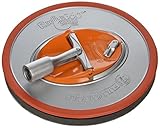
Best Hand SanderRadius 360 Air Hand Sander
Hand Held, 9 in Round, Swivel Head, Vacuum Port
Powered drywall sanders make sense for a room or a house. For a patch around a new light fitting, a repaired doorway, or touching up a few joints, dragging out a long machine and a vacuum is disproportionate, and hand sanding is both faster overall and more controllable. The Radius 360 is the best hand tool in this category and the reason is the swivel head. A conventional hand sanding block is held at whatever angle your wrist happens to be, which means the edge digs in and leaves marks. The swivel keeps the disc flat against the wall no matter how you hold the handle, and the round shape has no corners to gouge with. The result is a noticeably better finish than a flat block produces, particularly for someone without much practice. A vacuum port is available, which is unusual on a hand sander and makes a real difference to the dust in a small repair job where sheeting the room off is not worth it. It attaches to a pole for ceilings. What it cannot do is compete on speed. Sanding a full room by hand is slow and physically demanding work, especially overhead, and that is exactly what powered machines exist to solve. As a companion to one, or as the only tool for small work, it is excellent.
Pros
- Swivel head keeps the disc flat against the wall regardless of hand angle
- Round shape with no corners to dig into the surface
- Vacuum port available, which is rare on a hand sander
- Very light and precise for detail work and small repairs
- Inexpensive compared with any powered machine
Cons
- Manual sanding is slow across a whole room
- Requires physical effort, particularly on ceilings
- Round shape cannot reach fully into corners
The Bottom Line
Not a replacement for a powered sander, but the best hand tool here and the right choice for patch work.
4. Sanding Compound Without Ruining It
Drywall sanding is unusual in that the most common error is doing too much rather than too little, and the damage is not always visible until the paint goes on.
Use a light touch and let the disc work. Joint compound is soft and a powered sander removes it fast. Pressing produces swirl marks and cuts through the compound into the paper face of the board, which then has to be re-mudded.
Never sand through to the paper. Once the paper face is fuzzed, it will show through paint as a rough patch and it absorbs primer differently. Repairing it means another coat of compound and another sanding session.
Keep the head moving in overlapping circles. A stationary rotating disc dishes the compound. Continuous overlapping movement across the joint blends the edges into the board surface, which is the whole objective.
Work 120 to 150 grit. Coarser cuts through compound too fast and leaves scratches that show. Finer clogs immediately on soft compound. This range is what professionals use for finish sanding.
Feather the edges rather than sanding the middle. A visible joint is usually a ridge at the edge of the compound, not a lump in the centre. Concentrating on blending the perimeter into the board does more for the finish than flattening the middle.
Check with raking light before you stop. Hold a work light flat against the wall and look along the surface. Ridges and hollows invisible under room lighting appear immediately, and finding them now is far cheaper than finding them after painting.
Prime Before You Judge It
Sanded compound and drywall paper look completely different under paint because they absorb it at different rates. A wall that looks perfect bare will show every joint once painted. A coat of primer reveals the true state of the surface while it is still easy to touch up, and it is the step that separates professional-looking work from obviously amateur work.
5. Choosing the Vacuum, Not Just the Sander
On every machine here except one, the dust performance is determined by the vacuum you attach rather than by the sander itself.
The supplied bag is never enough. Onboard collection bags capture a fraction of the dust at best. Every review of these tools that praises dust collection is describing performance with a vacuum attached, and the bag alone gives a very different experience.
Fine dust filtration is the specification that matters. A standard shop vacuum filter passes compound dust straight through and exhausts it into the room. A HEPA or fine dust filter, plus a fine dust collection bag, is what actually captures it.
Suction volume matters more than peak pressure. Drywall sanding produces a high volume of light dust rather than heavy debris, so airflow through the hose is what carries it away. A vacuum rated for airflow rather than lift performs better.
Autostart is genuinely useful. Vacuums that switch on when the tool is triggered remove the temptation to make one quick pass without turning the extraction on, which is how a room gets dusted.
Expect to change the bag often. Compound dust fills a vacuum bag quickly and a full bag chokes airflow, at which point extraction quietly stops working while the machine sounds exactly the same. Check it far more often than seems necessary.
Budget for it before buying the sander. Adding a proper vacuum to a cheap sander produces better real-world results than a better sander with a poor vacuum, so if the budget is fixed, that is where the money should go.
6. Timing, Coats and Knowing When to Stop
Half of a good drywall finish is decided before any sanding happens, in how the compound was applied and how long it was left.
Compound must be fully dry, not merely surface dry. Sanding compound that is still damp underneath tears rather than cuts, loads the disc instantly, and leaves a scarred surface that needs recoating. In a cool or humid room, overnight is a minimum and longer is safer.
Three coats is the normal expectation. A tape coat, a fill coat and a finish coat, each wider than the last. Trying to achieve the finish in two coats means each is thicker, dries slower, shrinks more, and needs far more sanding to flatten.
Sand lightly between coats, not thoroughly. Between coats the job is knocking down ridges and lumps so the next coat sits flat, which takes a few passes. Full sanding at this stage wastes effort because the next coat covers it anyway.
Better application means dramatically less sanding. A well feathered coat applied with a wide knife needs a fraction of the sanding that a thick, ridged coat does. Time spent getting the compound flat with the knife is repaid several times over at the sanding stage.
Shrinkage shows up after drying. Compound loses volume as it dries, so a joint that looked filled can show a slight hollow the following morning. Checking after full drying and adding a thin skim where needed is normal rather than a failure.
Stop when raking light shows nothing. The temptation is to keep going for a perfect surface, and past a certain point more sanding only risks breaking through to the paper. When a light held flat against the wall casts no shadows, the joint is finished.
7. Preparing the Room
Even excellent extraction leaves some dust, and half an hour of preparation saves a week of finding compound in unexpected places.
Seal doorways with plastic and tape. Not a hung sheet, which billows and lets dust past, but plastic taped along all four edges with a zipped or overlapped access slit. Fine dust travels through the smallest gap.
Cover or seal air vents and returns. A running HVAC system will distribute compound dust through the entire house and load the filter and ductwork. Tape over supply and return grilles in the work area, and switch the system off while sanding.
Remove what you can, cover what you cannot. Anything with a fan, a vent or a moving part suffers from compound dust. Electronics, appliances and tools should leave the room rather than be covered.
Open a window with a fan blowing out. Negative pressure in the work room keeps dust from migrating into the rest of the house and gives the fine airborne fraction somewhere to go.
Wear a proper respirator and eye protection. Compound dust in the respirable range with silica content is not something to breathe, and it is deeply unpleasant in the eyes. A rated half mask and sealed goggles are the correct kit.
Vacuum, then damp wipe, then vacuum again. Sweeping puts the dust back into the air. Vacuum with a fine filter first, wipe surfaces with a damp cloth to capture what remains, then vacuum once more after everything has settled overnight.
Before You Buy
Also Needed for This Job
8. Frequently Asked Questions
What is the best drywall sander?
Festool PLANEX LHS 2 for professionals, because its dust extraction is far ahead of anything else and it is the only machine that keeps a room usable while sanding. For most people the Porter-Cable 7800 is the sensible choice, and the WEN 6369 handles a single renovation cheaply.
Do I need a vacuum with a drywall sander?
Yes, on every machine except the Festool the supplied bag captures only a fraction of the dust. You also need the right vacuum: a standard filter passes compound dust straight through and exhausts it into the room, so a fine dust or HEPA filter is essential rather than optional.
What grit should I use for drywall?
Between 120 and 150 grit for finish sanding. Coarser cuts through the compound too quickly and leaves scratches that show through paint, while finer clogs almost immediately on soft compound. Use 100 grit only for knocking down heavy ridges before finish sanding.
Can I use a random orbit sander on drywall?
You can, but it is slow and risky. The small pad means many more passes, there is no reach for ceilings, and the aggressive cut makes it easy to go through the compound into the paper face of the board, which then needs re-mudding and re-sanding.
How do I stop drywall dust getting everywhere?
Extraction at the tool with a fine filtered vacuum does most of it. Then seal doorways with taped plastic rather than hung sheets, cover HVAC vents and switch the system off, and put a fan in a window blowing outward to keep the work room at negative pressure.
Is sanding drywall dust dangerous?
It should be treated seriously. The particles are in the respirable size range and many joint compounds contain crystalline silica. A rated half mask respirator, not a paper nuisance mask, plus sealed eye protection is the correct precaution for any extended sanding.
9. Common Drywall Sanding Mistakes
Drywall sanding errors either show up under paint or fill your house with dust, and both are avoidable.
Sanding Through to the Paper
Joint compound is soft and a powered sander cuts through it fast. Once the paper face of the board is fuzzed it absorbs paint differently and shows as a rough patch, which means another coat of compound and another sanding session. Use a light touch and let the disc do the work.
Relying on the Dust Bag
Every machine here except the Festool captures only a fraction of the dust through its bag, and compound dust is fine enough to stay airborne for hours and reach every room. Connect a vacuum, and make sure that vacuum has a fine dust or HEPA filter rather than a standard one.
Judging the Wall Before Priming
Bare compound and drywall paper absorb paint at different rates, so a wall that looks flawless unpainted will show every joint once the colour goes on. A coat of primer reveals the true surface while touch-ups are still easy, and skipping it is the classic amateur error.
Leaving the HVAC Running
A running heating or cooling system pulls compound dust into the return, distributes it through every room in the house, and loads both the filter and the ductwork. Tape over the grilles in the work area and switch the system off before you start sanding.
Related Renovation Guides
The Bottom Line
The best drywall sander is the Festool PLANEX LHS 2 if you finish drywall professionally, purely on dust extraction. For everyone else, Porter-Cable 7800 is the sensible buy and WEN 6369 gets one renovation done cheaply.
Spend on the vacuum before you spend on the sander, keep a light touch so you never break the paper, and prime before you decide the wall is finished.
More in Tools & Equipment
Guides in this category that pair with what you just read.
About the Author
Alex Rivers, Home Improvement Editor
Alex has spent over a decade working on residential and light commercial property maintenance, and now tests every tool, coating and machine that appears in these guides personally.